4 Methods to Share Data between Components in Angular


In this tutorial, we’ll explore different ways to share data between components in Angular. Since component communication is a core part of Angular development, choosing the right approach depends on how your components are related and how the data needs to flow.
To make this easier to understand, we’ll walk through each method step by step with practical examples. Let’s get started.
Prerequisites:
- Basic knowledge of JavaScript and TypeScript
- Understanding of Angular fundamentals (components, templates, and modules)
- Visual Studio Code or any preferred code editor
- Node.js (version 16 or later) and npm installed
- Angular CLI installed globally
Step by step tutorial on sharing data between components in Angular
Step 1: Installing Angular CLI
First step, where we’ll have to install latest version of Angular CLI
npm install -g @angular/cliStep 2: Creating your Angular Project
In this second step, we will use Angular CLI to start our Angular Project
Go to CMD or Terminal and use this command:
ng new angular-demoThis CLI will ask you “whether you would like to add Angular routing” Say Yes.
It will ask “which stylesheet format you would like to use”. Choose CSS.
Now your project is ready Angular CLI will generate required files and folders along with NPM packages and routing too.
Now open your project in Visual studio code and go to your root folder and run the local development server using below command:
npm start- Now run localhost:4200/ in your browser
- You will see angular application index page.
Step 3: Create a new Component
- Let’s create a new component in app folder:
- A command for creating a new component:
ng g c childAs we can see here, child component has been created in the app folder. And automatically declared in app.module.ts file.
5 Methods to Share Data between Angular Components
- Parent to Child: via Input
- Child to Parent: via Output() and EventEmitter
- Child to Parent: via ViewChild
- Unrelated Components: via a Service
- Unrelated Components via Angular Signals
Method 1: Parent to Child via @Input decorator
What is Parent-to-Child Communication?
In Angular, every application is built using components. These components are organized in a tree-like structure where one component can contain another. The component that contains another is called the Parent Component, and the component sitting inside it is called the Child Component.
Now imagine the parent component has some data, like a user’s name or role, and you want to display that data inside the child component. How do you pass that data down? The answer is Angular’s @Input() decorator.
Step 1 – Set Up the Parent Component
Start by defining the data you want to pass to the child component.
app.component.ts
import { Component } from '@angular/core';

@Component({
  selector: 'app-root',
  templateUrl: './app.component.html'
})
export class AppComponent {
  userName = 'John Developer';
  userRole = 'Angular Developer';
}
Explanation
Here:
userNameanduserRoleare defined in the parent component- These values will be passed to the child component
Step 2 – Create the Child Component
Now create the child component and use @Input() to receive data from the parent.
child.component.ts
import { Component, Input } from '@angular/core';
@Component({
selector: 'app-child',
templateUrl: './child.component.html'
})
export class ChildComponent {
@Input() userName: string = '';
@Input() userRole: string = '';
}
Explanation
@Input() tells Angular that this value will come from the parent
The child does not define the data, it only receives it
Step 3 – Pass Data from Parent to Child
Now bind the parent data to the child component using property binding.
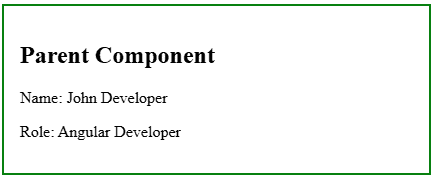
<div style="border: 2px solid green; padding: 16px;">
  <h2>Parent Component</h2>
  <p>Name: {{ userName }}</p>
  <p>Role: {{ userRole }}</p>

  <app-child
    [userName]="userName"
    [userRole]="userRole">
  </app-child>
</div>
Step 4 – Display Data in Child Component
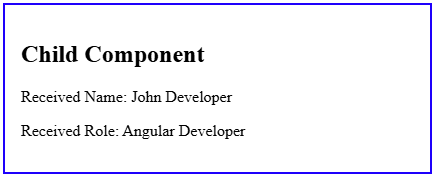
child.component.html
<div style="border: 2px solid blue; padding: 16px; margin-top: 16px;">
  <h2>Child Component</h2>
  <p>Received Name: {{ userName }}</p>
  <p>Received Role: {{ userRole }}</p>
</div>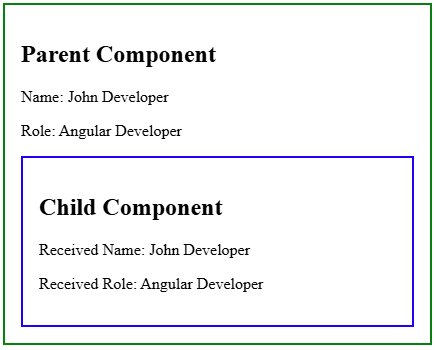
Explanation
The key line is:
<app-child [userName]="userName" [userRole]="userRole"></app-child>- Square brackets [ ] indicate property binding
- It means the value is coming from the parent component dynamically
Step 5 – What Happens When Data Changes?
Angular automatically updates the child component when the parent data changes.
Add this to parent:
changeName() {
  this.userName = 'Jane Designer';
}
Update template:
<button (click)="changeName()">Change Name</button>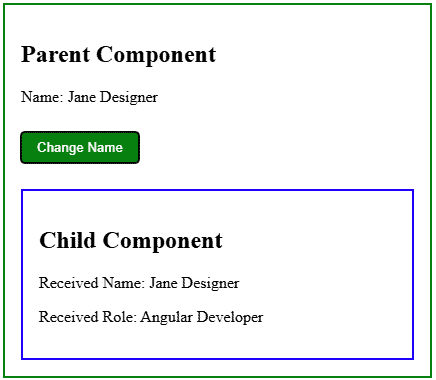
What happens:
- User clicks the button
- Parent updates userName
- Angular detects the change
- Child automatically receives updated value
Method 2: Child to Parent via @Output decorator and EventEmitter
When a child component needs to send data back to its parent, Angular provides a simple and effective way to do it using @Output() and EventEmitter.
- @Output() is used to define a custom event in the child component.
- EventEmitter is used to emit data from the child to the parent.
This is commonly used when the child component needs to notify the parent about an action such as clicking a button, submitting a form, or sending an updated value.
In this example, we will pass a name from the child component to the parent component.
Step 1 – Create the Child Component
First, create the child component and define the value you want to send to the parent. Then create an @Output() property using EventEmitter.
all above steps completed our folder structure look like after adding route for test component will be like below:
child.component.ts
import { Component, EventEmitter, Output } from '@angular/core';
@Component({
 selector: 'app-child',
 templateUrl: './child.component.html'
})
export class ChildComponent {
 childName = 'John Smith';

 @Output() updatedName = new EventEmitter<string>();

 sendData() {
   this.updatedName.emit(this.childName);
 }
}
Explanation
Here, updatedName is the custom event that will send data to the parent component.
When sendData() is called, the current value of childName is emitted.
Step 2 – Add the Child Component Template
Now create the child component template. Add an input field and a button so the user can enter a name and send it to the parent.
child.component.html
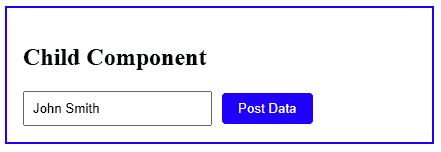
<div style="border: 2px solid blue; padding: 16px; margin-top: 16px;">
 <h2>Child Component</h2>

 <input [(ngModel)]="childName" placeholder="Enter name" />
 <button (click)="sendData()">Post Data</button>
</div>
Explanation
The input field is bound to childName using [(ngModel)], so whatever the user types is stored in that variable.
When the button is clicked, sendData() runs and emits the value.
Step 3 – Create the Parent Component
Next, create the parent component. Add a variable to store the value received from the child and define a method to handle the incoming data.
app.component.ts
import { Component } from '@angular/core';
@Component({
selector: 'app-root',
templateUrl: './app.component.html'
})
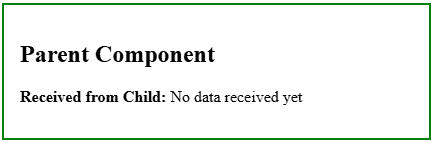
export class AppComponent {
parentName = 'No data received yet';
receiveData(name: string) {
this.parentName = name;
}
} 
Explanation
The parentName variable stores the value received from the child component.
The receiveData() method is used to capture the emitted value and assign it to parentName.
Step 4 – Listen for the Child Event in the Parent Template
Now place the child component inside the parent template and listen for the updatedName event.
app.component.html
<div style="border: 2px solid green; padding: 16px;">
 <h2>Parent Component</h2>
 <p>Received from Child: {{ parentName }}</p>

 <app-child (updatedName)="receiveData($event)"></app-child>
</div> 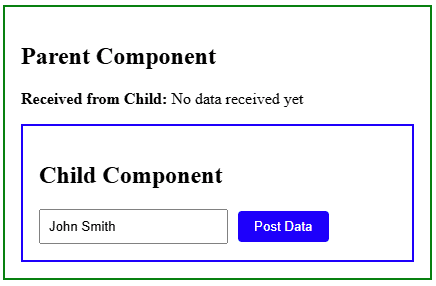
Explanation
This line is the key part of child-to-parent communication:
- (updatedName) listens for the custom event emitted by the child
- $event contains the value sent by the child
- receiveData($event) passes that value to the parent method
Step 5 – Click the Button to Send Data
Now enter a value in the child component input field and click the Post Data button.
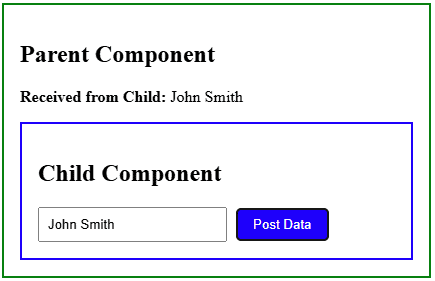
What happens here
- The user types a name in the child component
- The user clicks Post Data
- The child emits the entered value using updatedName
- The parent listens for the event
- The parent receives the value through $event
- The parent updates parentName
Method 3: Child to Parent via @ViewChild() Decorator
Sometimes, a parent component needs to directly access a child component’s properties or methods. In Angular, this can be done using the @ViewChild() decorator.
Unlike @Output() and EventEmitter, where the child actively sends data to the parent, @ViewChild() works differently. Here, the parent directly gets a reference to the child component and can then read its data or call its methods.
This approach is useful when:
- the parent needs to access a child method
- the parent needs to read a child property
- the communication is tightly controlled by the parent
In this example, the parent component will use @ViewChild() to access a method from the child component and receive data from it.
Step 1 – Create the Child Component
First, create the child component. Inside it, define a variable and a method that returns that value.
child.component.ts
import { Component } from '@angular/core';

@Component({
 selector: 'app-child',
 templateUrl: './child.component.html'
})
export class ChildComponent {
 childMessage = 'Hello from Child Component';

 sendMessage() {
   return this.childMessage;
 }
} 
Explanation
Here:
- childMessage stores the message inside the child component
- sendMessage() returns that message when called by the parent
- The child is not emitting anything on its own. Instead, the parent will access this method directly using @ViewChild().
Step 2 – Add the Child Component Template
Now create the child component template.
child.component.html
<div style="border: 2px solid blue; padding: 16px; margin-top: 16px;">
 <h2>Child Component</h2>
 <p>{{ childMessage }}</p>
</div>
This template simply displays the value stored in childMessage.
Step 3 – Create the Parent Component
Now create the parent component. Here, we will use @ViewChild() to get access to the child component.
app.component.ts
import { AfterViewInit, Component, ViewChild } from '@angular/core';
import { ChildComponent } from './child.component';
@Component({
selector: 'app-root',
templateUrl: './app.component.html'
})
export class AppComponent implements AfterViewInit {
@ViewChild(ChildComponent) childComponent!: ChildComponent;
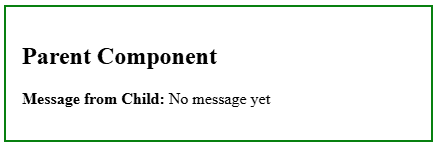
messageFromChild = 'No message yet';
ngAfterViewInit() {
this.messageFromChild = this.childComponent.sendMessage();
}
} 
Explanation
Here:
- @ViewChild(ChildComponent) gets a reference to the child component
- childComponent gives the parent direct access to the child
- ngAfterViewInit() is used because the child component becomes available only after the view has been initialized
- sendMessage() is called from the parent, and the returned value is stored in messageFromChild
Step 4 – Add the Parent Template
Now place the child component inside the parent template and display the value received from the child.
app.component.html
<div style="border: 2px solid green; padding: 16px;">
 <h2>Parent Component</h2>
 <p><strong>Message from Child:</strong> {{ messageFromChild }}</p>

 <app-child></app-child>
</div> 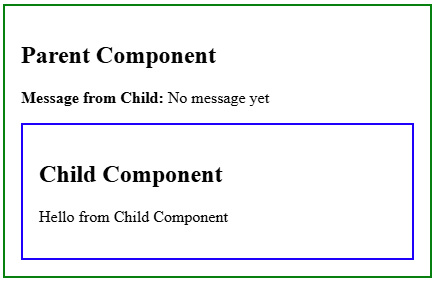
Once the child component is rendered, the parent accesses it through @ViewChild() and displays the returned message.
Understand How @ViewChild() Works
The most important line is:
@ViewChild(ChildComponent) childComponent!: ChildComponent; This tells Angular:
“Find the ChildComponent inside this parent view and give me access to it.”
After that, the parent can directly use below to get data from the child.
this.childComponent.sendMessage()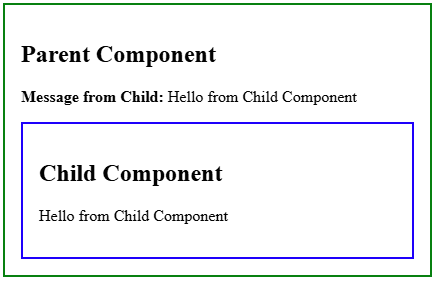
Output
Once the page loads, the parent component accesses the child component using @ViewChild(), calls its sendMessage() method, and displays the returned value.
This allows the parent to directly interact with the child component without needing an emitted event.
When to Use @ViewChild()
@ViewChild() is useful when the parent needs direct access to a child component’s methods or properties. It is a good choice when the parent wants more control over the interaction.
However, this method creates tighter coupling between components, so it should be used only when direct access is really needed.
Method 4: Unrelated Components via a Service
Not all components in Angular have a direct parent-child relationship. In many applications, two completely unrelated components still need to share data with each other.
For example:
- one component updates a message
- another component, located elsewhere in the application, displays that message
In this case, @Input(), @Output(), or @ViewChild() are not the right fit. A better approach is to use a shared service.
A service acts as a common place where components can store and retrieve data. Both components communicate through that service instead of talking to each other directly.
In this example, we will use a service to share a message between two unrelated components.
Step 1 – Create the Shared Service
First, create a service that will hold the shared data.
message.service.ts
import { Injectable } from '@angular/core';

@Injectable({
 providedIn: 'root'
})
export class MessageService {
 message = 'Hello from Sender Component';

 updateMessage(newMessage: string) {
   this.message = newMessage;
 }

 getMessage() {
   return this.message;
 }
}
Explanation
This service stores a message in one place.
- message holds the current value
- updateMessage() changes the message
- getMessage() returns the current message
Since the service is provided in root, Angular creates a single shared instance that can be used by multiple components.
Step 2 – Create the Sender Component
Now create the first component. This component will update the message in the service.
sender.component.ts
import { Component } from '@angular/core';
import { MessageService } from './message.service';

@Component({
 selector: 'app-sender',
 templateUrl: './sender.component.html'
})
export class SenderComponent {
 constructor(public messageService: MessageService) {}

 sendMessage() {
   this.messageService.updateMessage('Updated message from Sender Component');
 }
}
sender.component.html
<div style="border: 2px solid blue; padding: 16px; margin-top: 16px;">
 <h2>Sender Component</h2>
 <button (click)="sendMessage()">Send Message</button>
</div>
Explanation
The sender component injects the shared service and updates the message when the button is clicked.
Step 3 – Create the Receiver Component
Now create the second component. This component will read the value from the shared service.
receiver.component.ts
import { Component } from '@angular/core';
import { MessageService } from './message.service';

@Component({
 selector: 'app-receiver',
 templateUrl: './receiver.component.html'
})
export class ReceiverComponent {
 constructor(public messageService: MessageService) {}
}
receiver.component.html
<div style="border: 2px solid green; padding: 16px; margin-top: 16px;">
 <h2>Receiver Component</h2>
 <p><strong>Message:</strong> {{ messageService.getMessage() }}</p>
</div>
Explanation
The receiver component also injects the same service. Since both components use the same shared instance, the receiver can display the updated message.
Step 4 – Add Both Components to the Parent Template
Now place both unrelated components inside the main app template.
app.component.html
<h1>Sharing Data Between Unrelated Components</h1>
<app-sender></app-sender>
<app-receiver></app-receiver> 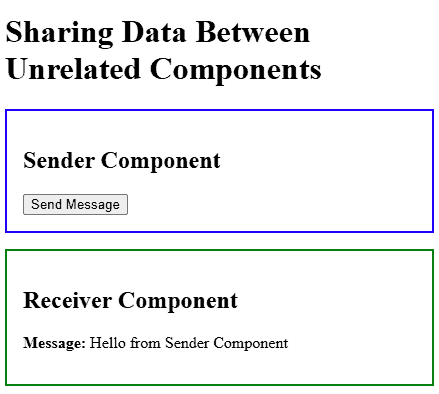
Explanation
Here, both components are displayed on the page. They do not directly communicate with each other. Instead, they both use the shared service.
Step 5 – Update the Message Through the Service
Now click the Send Message button in the sender component.
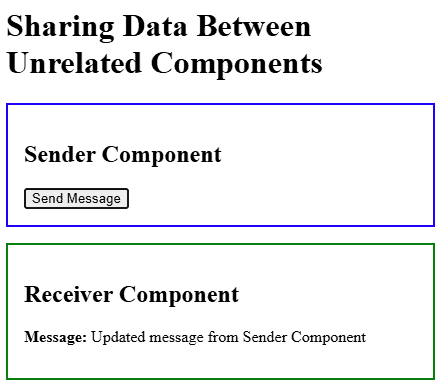
What happens here
- The sender component calls sendMessage()
- sendMessage() updates the value in the shared service
- The receiver component reads the updated value from the same service instance
- The new message is displayed in the receiver component
Method 5: Unrelated Components via Angular Signals (for modern apps)
Angular Signals are now part of Angular’s core reactive model, so they are a strong modern option for sharing state between unrelated components through a shared service. Angular’s docs describe signals as a lightweight reactive wrapper around a value, and Angular also positions them as a modern way to manage state.
This method works well when:
- two components are not directly related
- you want simpler shared state without a full RxJS setup
- you want UI updates to happen automatically when data changes
Unlike the older service example that uses plain variables, a signal-based service is reactive by default. When one component updates the signal, other components that read it update automatically. Angular also provides RxJS interop, which is useful when a project still mixes signals with observables.
Step 1 – Create the Shared Signal Service
First, create a service that stores the shared value using signal().
message.service.ts
import { Injectable, signal } from '@angular/core';

@Injectable({
 providedIn: 'root'
})
export class MessageService {
 message = signal('Hello from Sender Component');

 updateMessage(newMessage: string) {
   this.message.set(newMessage);
 }
}
Explanation
Here:
- message is a signal
- signal() creates reactive state
- set() updates the signal value
Whenever this signal changes, Angular automatically updates any component reading it. This matches Angular’s signal model, where signal values are read by calling them like a function.
Step 2 – Create the Sender Component
Now create the sender component. This component will update the signal value in the shared service.
sender.component.ts
import { Component } from '@angular/core';
import { MessageService } from './message.service';

@Component({
 selector: 'app-sender',
 templateUrl: './sender.component.html'
})
export class SenderComponent {
 constructor(public messageService: MessageService) {}

 sendMessage() {
   this.messageService.updateMessage('Updated message from Sender Component');
 }
}
sender.component.html
<div style="border: 2px solid blue; padding: 16px; margin-top: 16px;">
 <h2>Sender Component</h2>
 <button (click)="sendMessage()">Send Message</button>
</div>
Explanation
When the user clicks the button, the sender component updates the shared signal through the service.
Step 3 – Create the Receiver Component
Now create the receiver component. This component will read the signal value from the service.
receiver.component.ts
import { Component } from '@angular/core';
import { MessageService } from './message.service';

@Component({
 selector: 'app-receiver',
 templateUrl: './receiver.component.html'
})
export class ReceiverComponent {
 constructor(public messageService: MessageService) {}
}
receiver.component.html
<div style="border: 2px solid green; padding: 16px; margin-top: 16px;">
 <h2>Receiver Component</h2>
 <p><strong>Message:</strong> {{ messageService.message() }}</p>
</div>
Explanation
Notice this line: {{ messageService.message() }}
Signals are read by calling them like a function. When the signal value changes, Angular automatically refreshes the template. That behavior is central to Angular’s signal API.
Step 4 – Add Both Components to the Main Template
Now place both unrelated components inside the main app template.
app.component.html
<h1>Sharing Data Between Unrelated Components with Signals</h1>
<app-sender></app-sender>
<app-receiver></app-receiver> 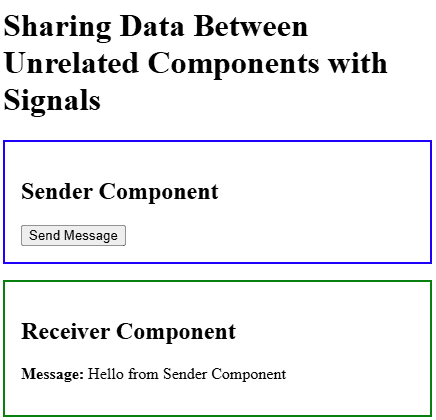
Explanation
Both components use the same service instance. The sender updates the signal, and the receiver reads the same signal value.
Step 5 – Update the Signal Value
Now click the Send Message button in the sender component.
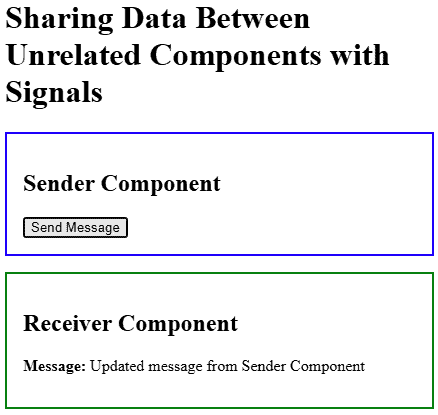
What happens here
- The sender component calls sendMessage()
- sendMessage() updates the signal using set()
- The receiver component reads the same signal from the shared service
- Angular automatically updates the receiver UI
This automatic update is one of the main benefits of signals in Angular’s reactive model.
Comparison of Angular Component Communication Methods
| Method | Best For | Relationship Type | Complexity | Scalability | Reactive | Modern Recommendation |
|---|---|---|---|---|---|---|
| @Input() | Passing data from parent to child | Parent → Child | Low | Low | Yes (automatic change detection) | Always use for simple data flow |
| @Output() | Sending data from child to parent (events, actions) | Child → Parent | Low | Low | Yes (event-based) | Best for user interactions |
| @ViewChild() | Accessing child component methods/properties directly | Parent → Child (direct access) | Medium | Low | No (manual access) | Use only when direct control is needed |
| Service (RxJS / Shared State) | Sharing data between unrelated components | Unrelated Components | Medium | Medium–High | Yes (if using RxJS) | Good for shared state in medium apps |
| Angular Signals | Sharing reactive state across components (modern approach) | Unrelated Components | Medium | High | Yes (built-in reactivity) | Recommended for modern Angular apps |
Conclusion
So, these are the most effective ways to share data between Angular components, from basic parent-child communication to more advanced patterns for unrelated components and modern reactive state management with Signals. I hope this article gave you a clearer understanding of when to use each method and how they fit into real Angular application development.
If you’re planning to build or scale an Angular application and need expert support, Samarpan Infotech offers professional Angular development services tailored to business and enterprise needs. Our experienced Angular developers can help you build fast, scalable, and maintainable applications with the right architecture from the start.
I am working as Jr. Full Stack Developer (.NET/Angular) at Samarpan Infotech. I've good analytical thinking and collaboration skills, and I love working with a team.