Start/Stop Azure Web app using PowerShell Script from Local Machine


Content Overview
To start and stop a web app in Azure from a local machine using a PowerShell script, you can use Azure PowerShell commands. Make sure you have the Azure PowerShell module installed and configured on your local machine. If you haven’t installed it, you can install it by following the below steps:
Step 1: Open PowerShell as an administrator.
Step 2: Run the following command to install the Azure PowerShell module:
Install-Module -Name Az -AllowClobber -Scope CurrentUser
This command installs the Azure PowerShell module for the current user and allows overwriting existing modules (-AllowClobber).
Step 3: If prompted to install the NuGet provider, confirm by typing “Y” and pressing Enter.
Step 4: Once the installation is complete, you can import the module:
Import-Module Az
After these steps, you should have the Azure PowerShell module installed and configured on your local machine. You can then proceed to use the PowerShell scripts provided earlier to start and stop your Azure web app. How we will learn it soon.
Note: Keep in mind that the steps might vary slightly based on your PowerShell version and system configuration. Additionally, make sure you have the necessary permissions to install modules and manage resources in Azure.
There are many way possible way to start and stop your Azure web app using powerless script, but we will learn main 3 ways.
Method 1: By Connecting Azure Account to PowerShell Window
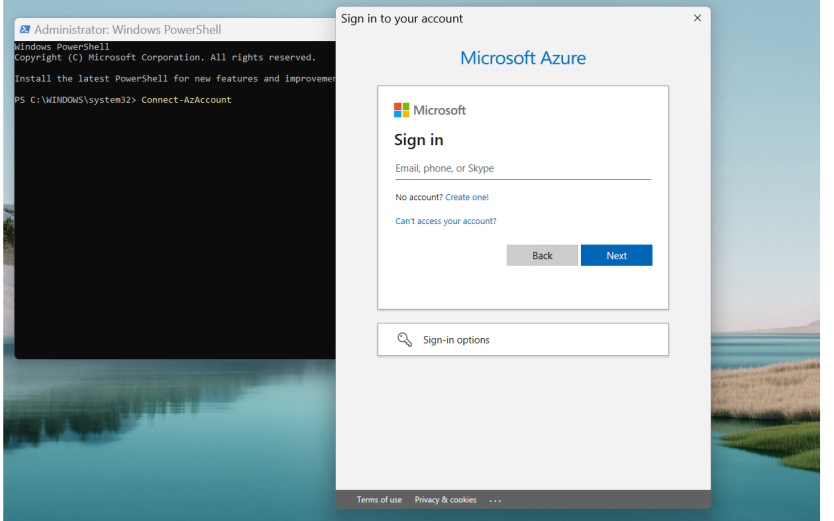
Open PowerShell as an administrator. Run the following command to configure your azure account with powershell window.
Connect-AzAccount
This command will prompt you to log in to your Azure account. Follow the instructions on the screen to complete the authentication process.
Below is a simple PowerShell script that you can use to start and stop a web app in Azure. Replace “your-subscription-id“, “YourResourceGroupName“, and “YourWebAppName” with your actual subscription ID, resource group name, and web app name.
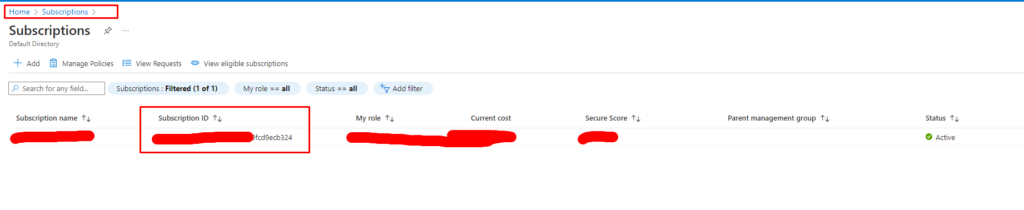
Subscription ID you will get as blow:
StartWebApp.ps
# Set your Azure subscription
$subscriptionId = "your-subscription-id"
az account set --subscription $subscriptionId

# Set your resource group and web app names
$resourceGroupName = "YourResourceGroupName"
$webAppName = "YourWebAppName"

# Start the web app
az webapp start --name $webAppName --resource-group $resourceGroupName
Write-Output "Azure Web App $webAppName started successfully."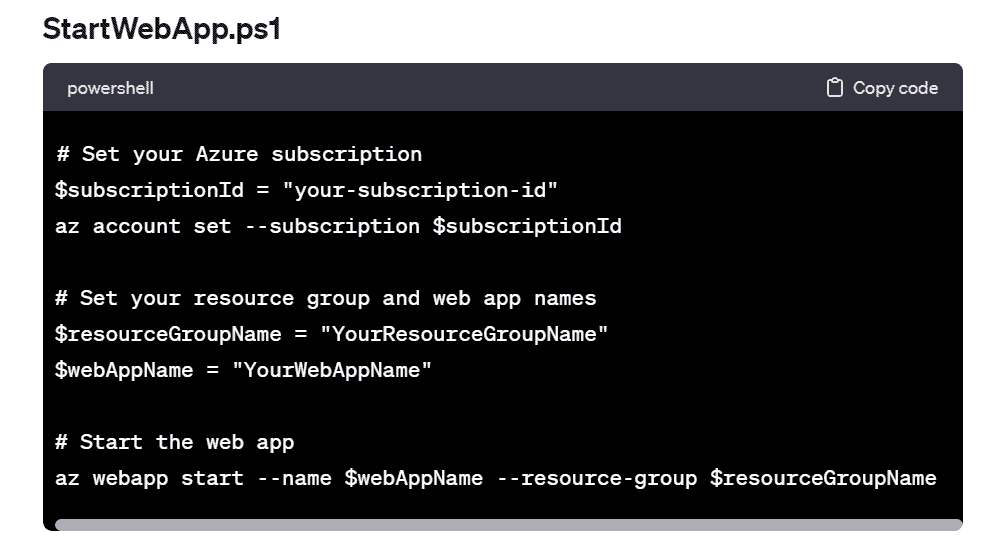
StopWebApp.ps1]
# Set your Azure subscription
$subscriptionId = "your-subscription-id"
az account set --subscription $subscriptionId

# Set your resource group and web app names
$resourceGroupName = "YourResourceGroupName"
$webAppName = "YourWebAppName"

# Start the web app
az webapp start --name $webAppName --resource-group $resourceGroupName
Write-Output "Azure Web App $webAppName started successfully."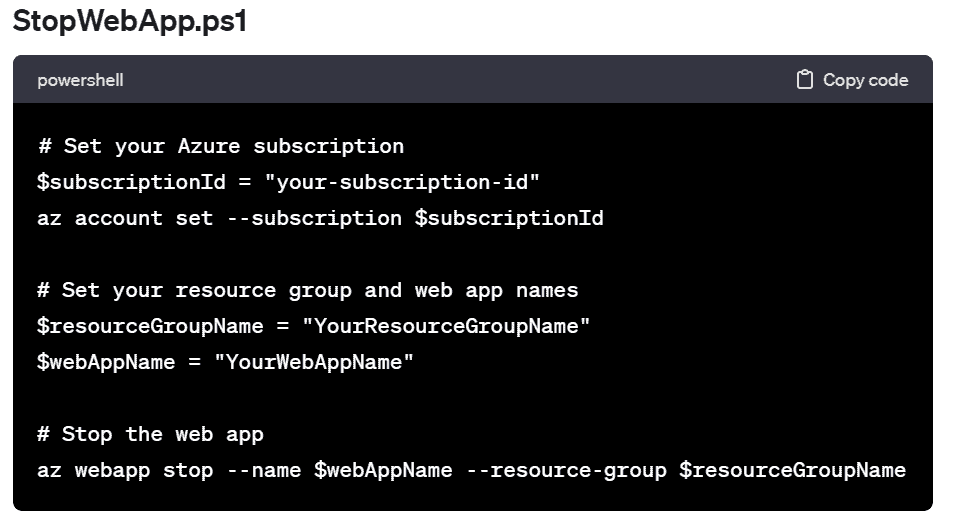
Save these scripts with .ps1 extension (e.g., StartWebApp.ps1 and StopWebApp.ps1) and then run them using PowerShell on your local machine. The scripts use the Azure PowerShell module to interact with Azure and start or stop the specified web app.
Please note that you need to have the appropriate permissions to manage the resources in Azure. Ensure that your Azure account has the necessary rights to start and stop the web app.
Powershell Window:
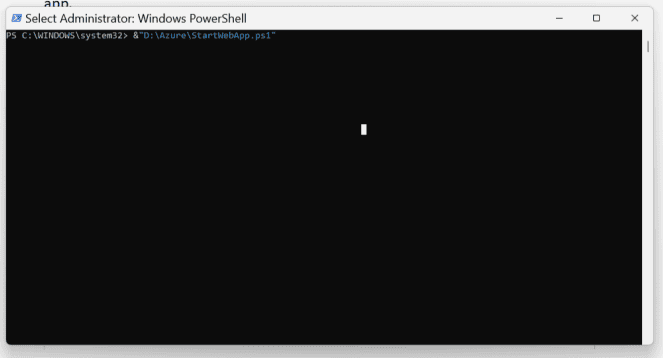
Set proper directory path and run the script by pressing enter on PowerShell Window.
(&”D:\Azure\StartWebApp.ps1″)
So, as above way you can start or stop azure web app from local machine using powershell script. Let’s see next possible way.
Method 2: By using an Azure AD App
If you want to use an Azure AD App (Service Principal) for authentication and authorization to manage Azure resources through PowerShell, you can follow these steps:
1. Create an Azure AD App (Service Principal)
- Go to the Azure Portal.
- Navigate to “Azure Active Directory” > “App registrations” > “New registration.”
- If you can’t find “Azure Active Directory” then search for “Microsoft Entra ID”.
Click on “App registrations”:
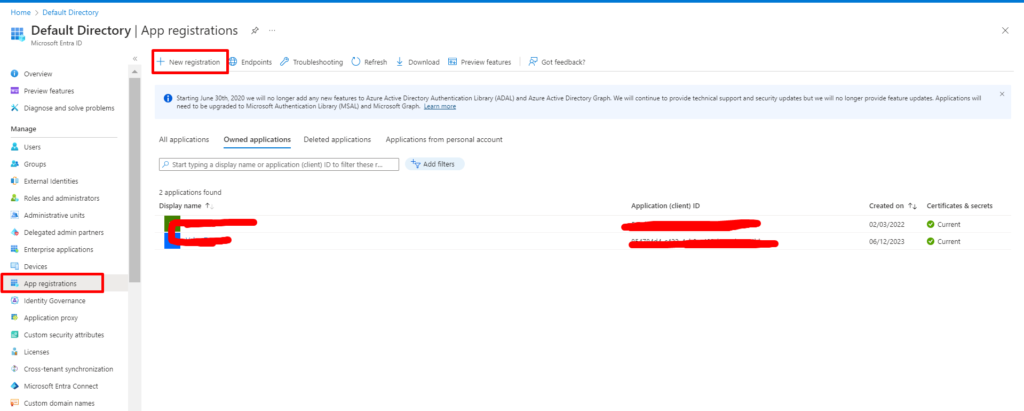
Clicking by “New registration”:
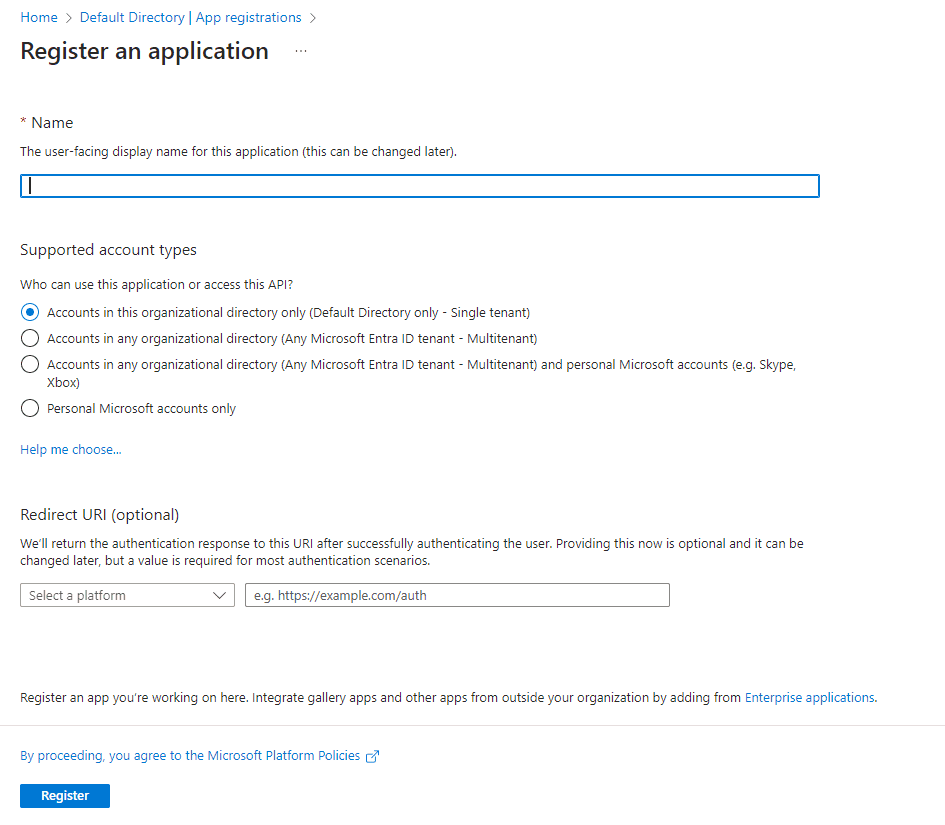
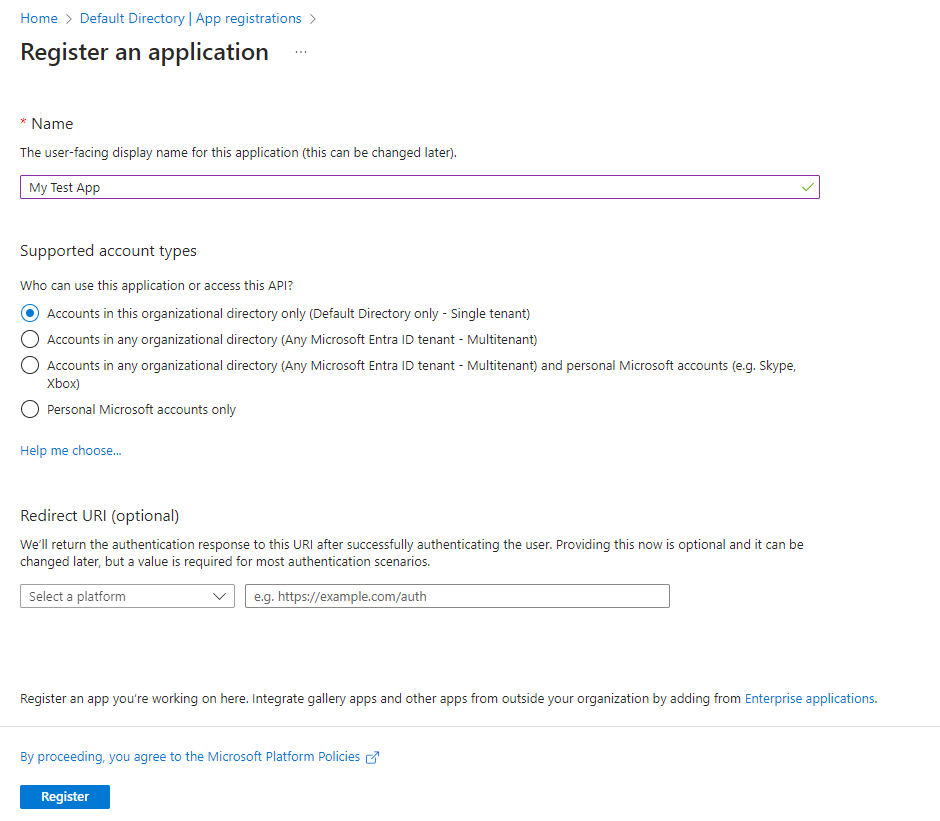
Fill in the required details, including a meaningful name and the redirect URI (you can use http://localhost for now if you want or you can let it blank).
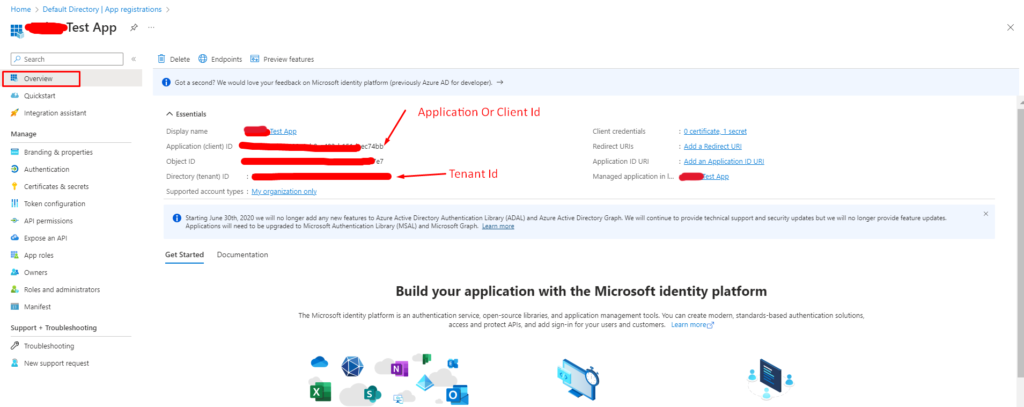
After registration, note down the “Application (client) ID” and “Directory (tenant) ID” from the app overview page.
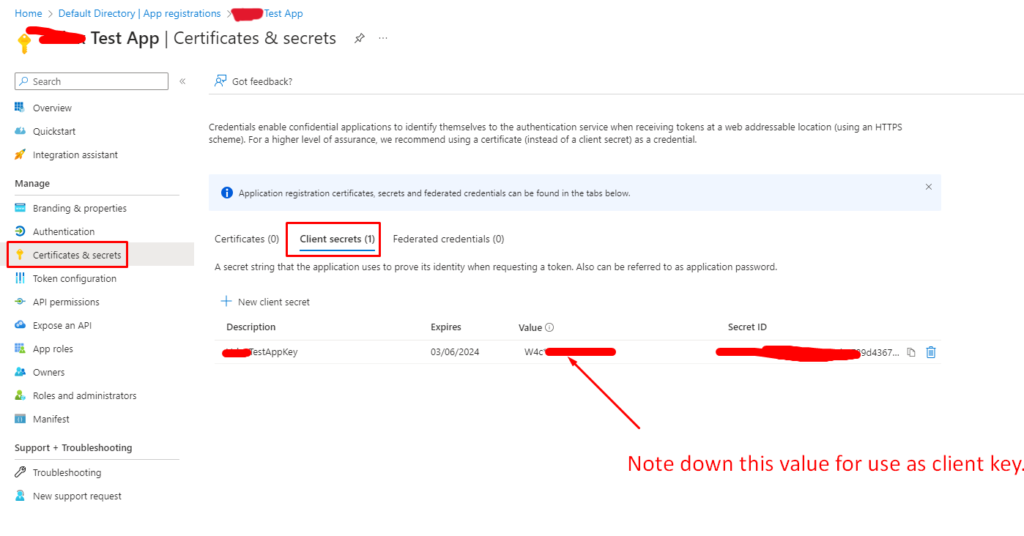
2. Create a Secret for the App
- In the Azure AD App, go to “Certificates & secrets.”
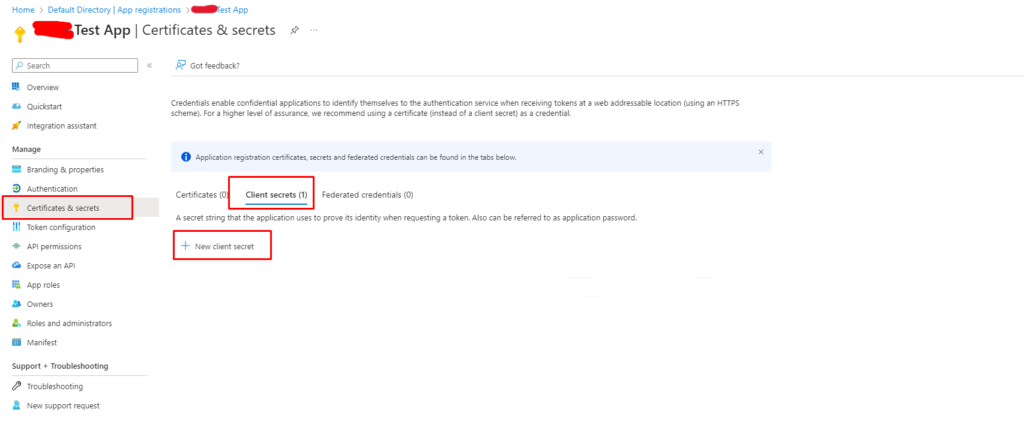
- Under “Client secrets,” click on “New client secret.”

- Note down the generated secret value.
3. Assign Permissions to the App
In the Azure AD App, go to “API Permission”.
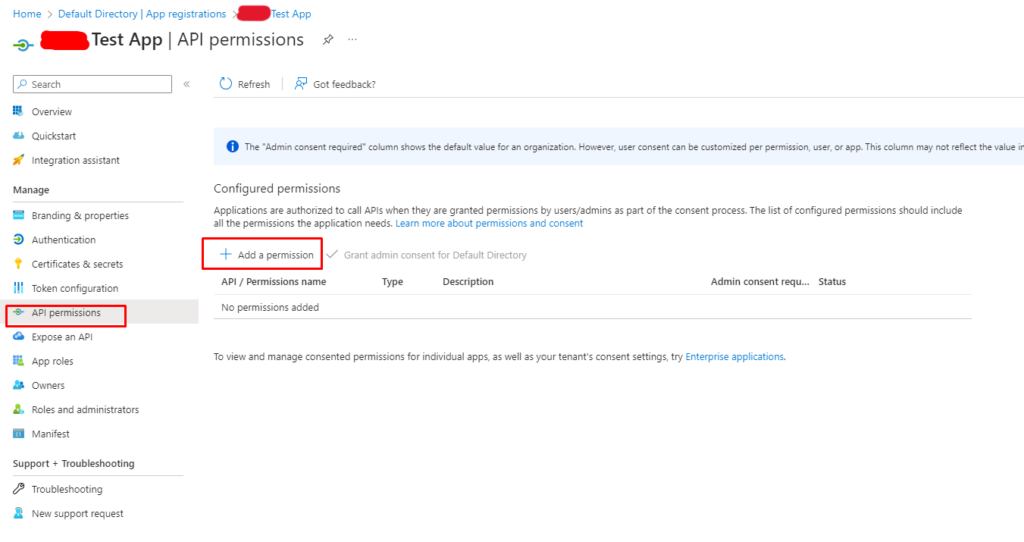
Click on “Add a permission”, you will see screen like below:
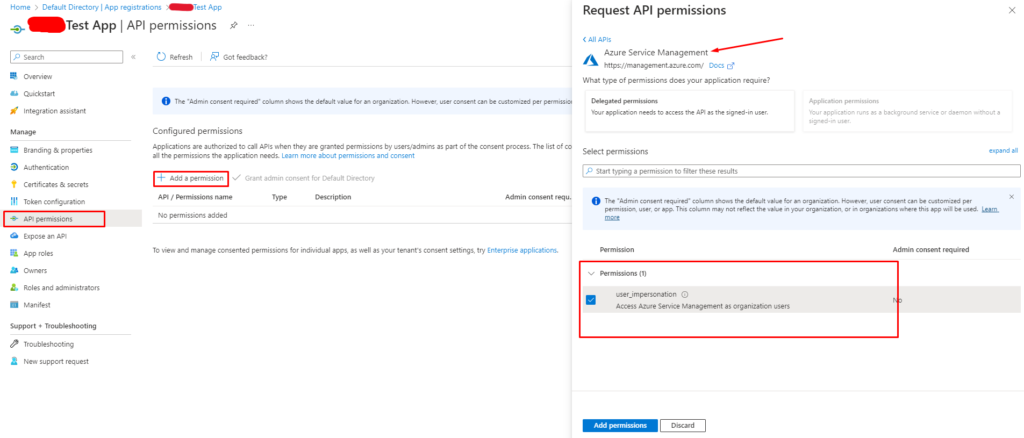
Add necessary permissions:
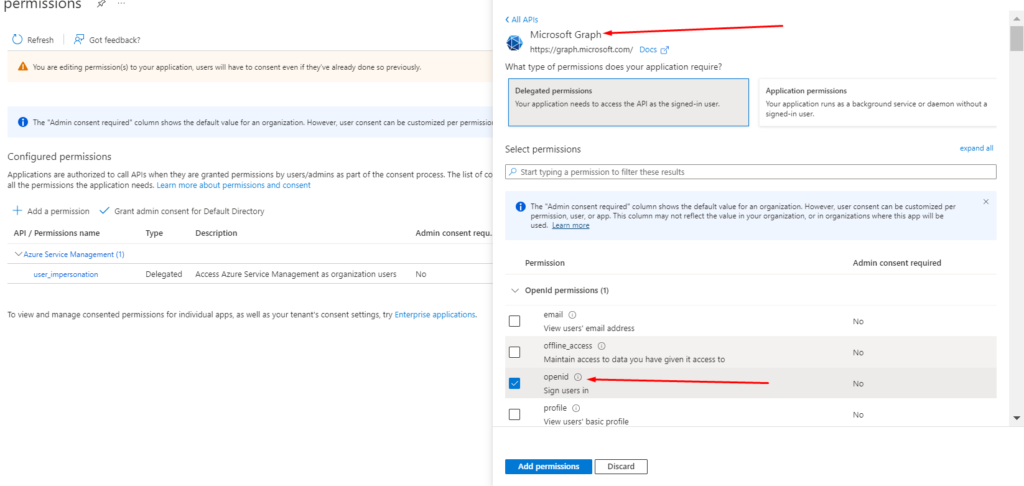
Assign the necessary permissions based on the actions your script needs to perform.
4. Grant Admin Consent
In the Azure AD App, go to “API permissions” > “Grant admin consent for {your directory}.”
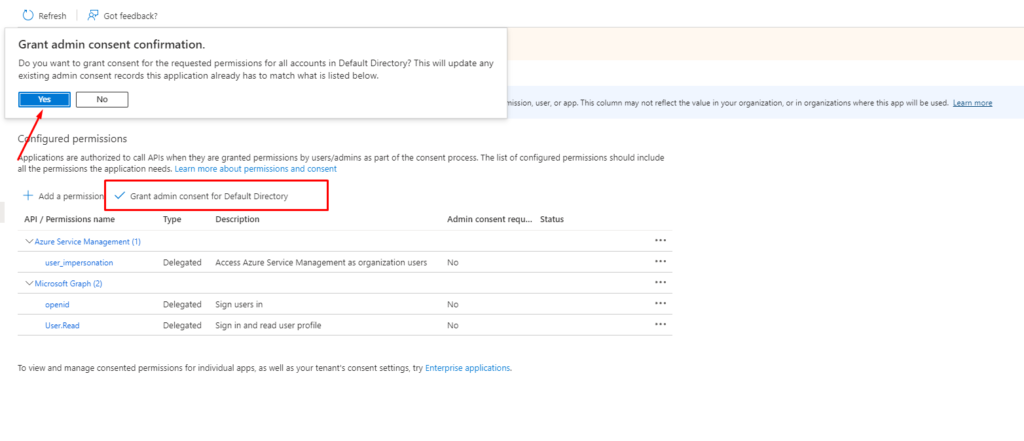
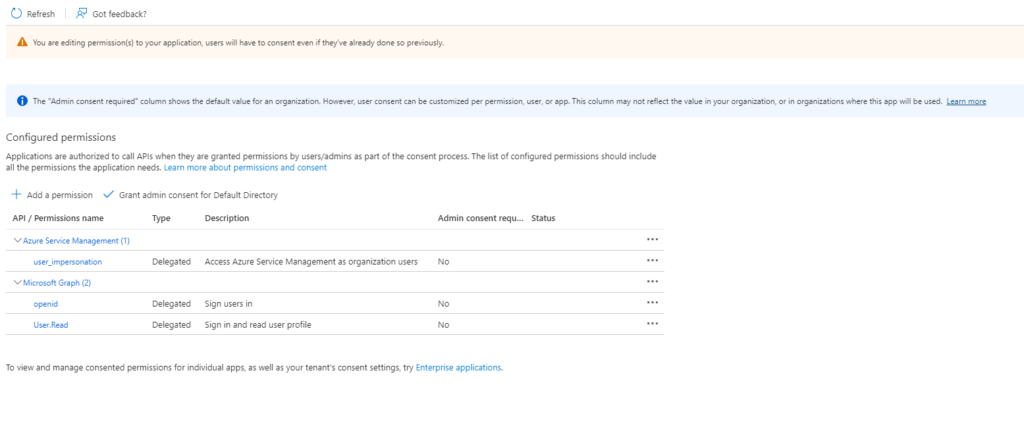
After confirming the “Grant Admin Consent” you will see changed status for added permission.

Okay, So Our app is successfully registered and added necessary permission and also, get necessary credentials like “Application Id”, “Client Id”, “Tenant Id”, and “Subscription Id”.
Advance permission: Role based access control
- Grant a user access to Azure resources: Assign an app as an administrator of an Azure subscription. Without assigning a role to an AD app you can’t able to access resource group or subscription.
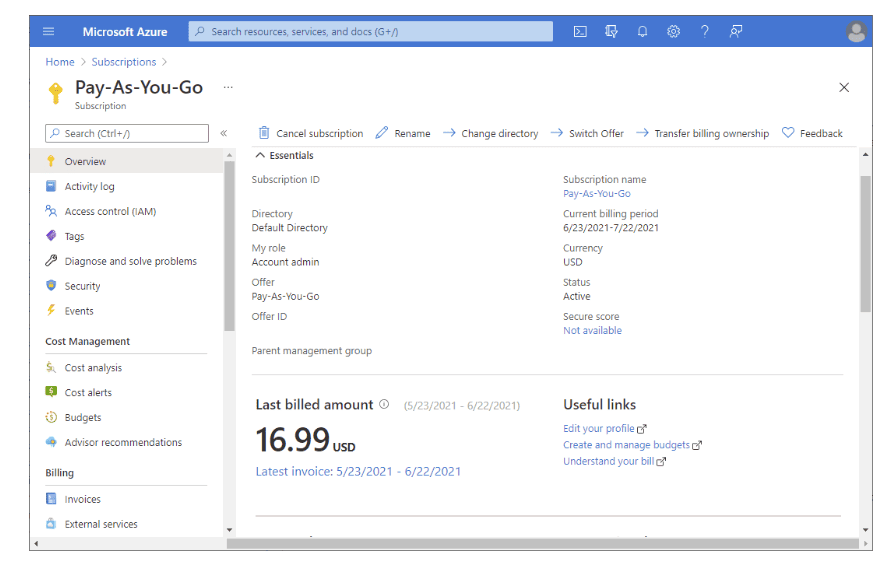
Step 1: Open the subscription
- In the Search box at the top, search for subscriptions.
- Click the subscription you want to use.
The following shows an example subscription.
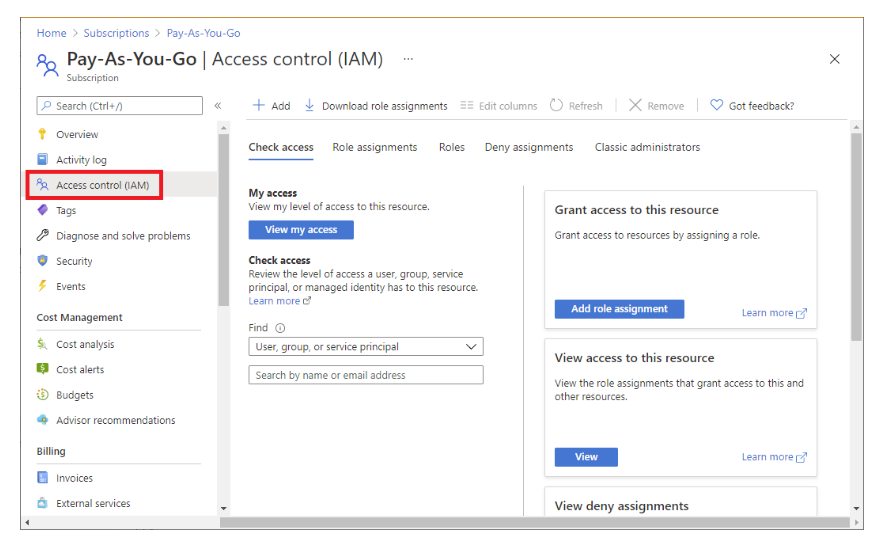
Step 2: Open the Add role assignment page
- Access control (IAM) is the page that you typically use to assign roles to grant access to Azure resources.
- It’s also known as identity and access management (IAM) and appears in several locations in the Azure portal.
1. Click Access control (IAM)
The following shows an example of the Access control (IAM) page for a subscription.
2. Click the Role assignments tab to view the role assignments at this scope.
3. Click Add > Add role assignment.
If you don’t have permissions to assign roles, the Add role assignment option will be disabled.
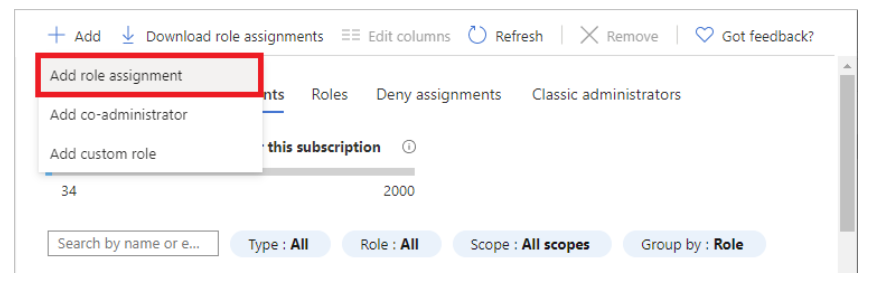
The Add role assignment page opens.
Step 3: Select the Owner role
The Owner role grant full access to manage all resources, including the ability to assign roles in Azure RBAC. You should have a maximum of 3 subscription owners to reduce the potential for breach by a compromised owner.
1. On the Role tab, select the Privileged administrator roles tab.
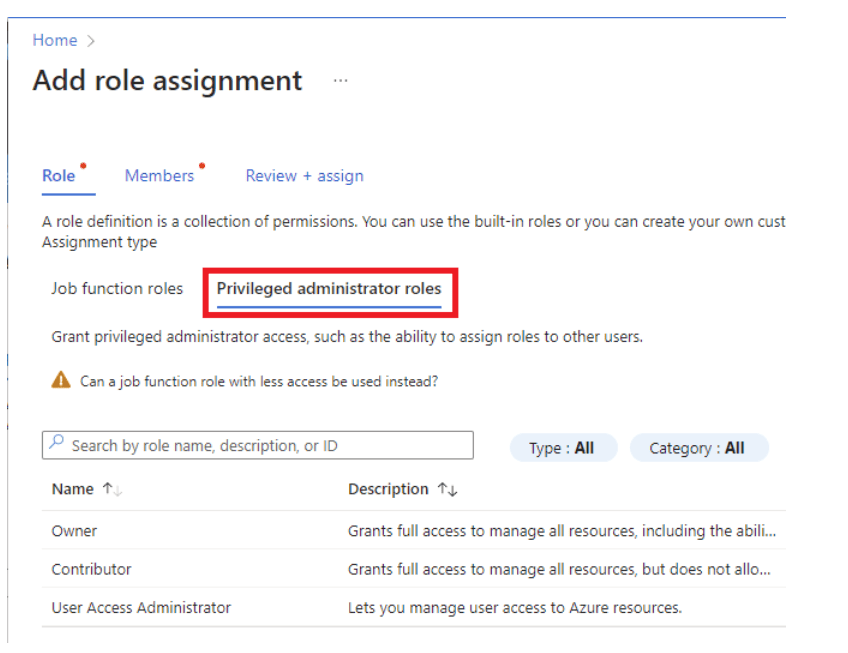
2. Select the Owner role.
3. Click Next.
Step 4: Select who needs access
1. On the Members tab, select User, group, or service principal.
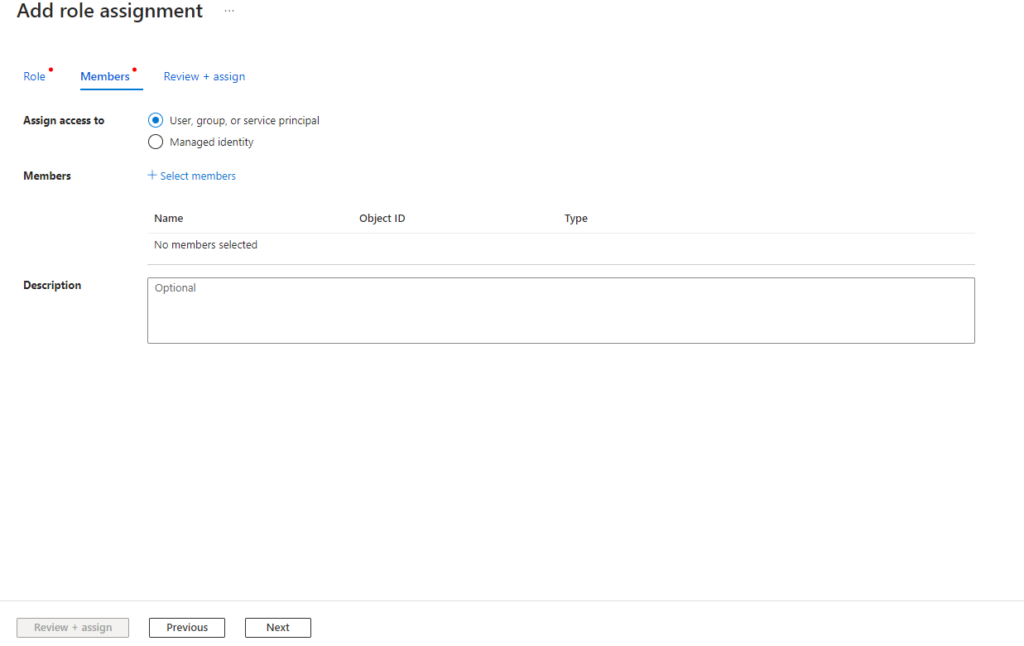
2. Click Select members.
3. Find and select the user.
You can type in the Select box to search the directory for display name or email address.
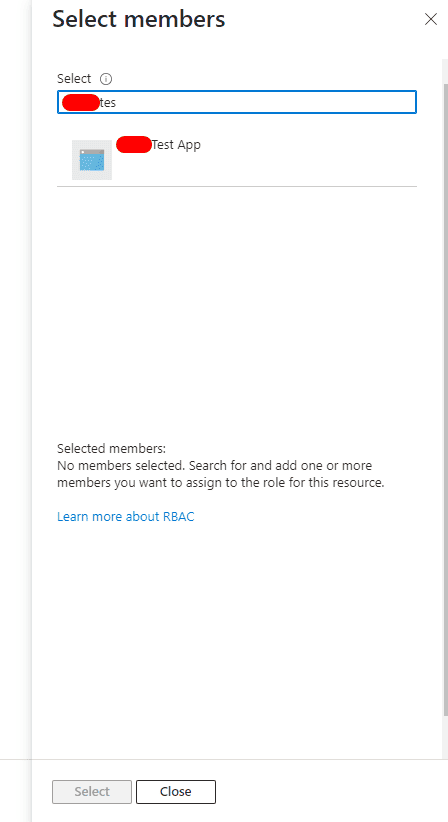
4. Click Save to add the user to the Members list.
5. In the Description box enter an optional description for this role assignment.
Later you can show this description in the role assignments list.
6. Click Next.
Step 5: Assign role
1. On the Review + assign tab, review the role assignment settings
2. Click Review + assign to assign the role.
After a few moments, the user is assigned the Owner role for the subscription.
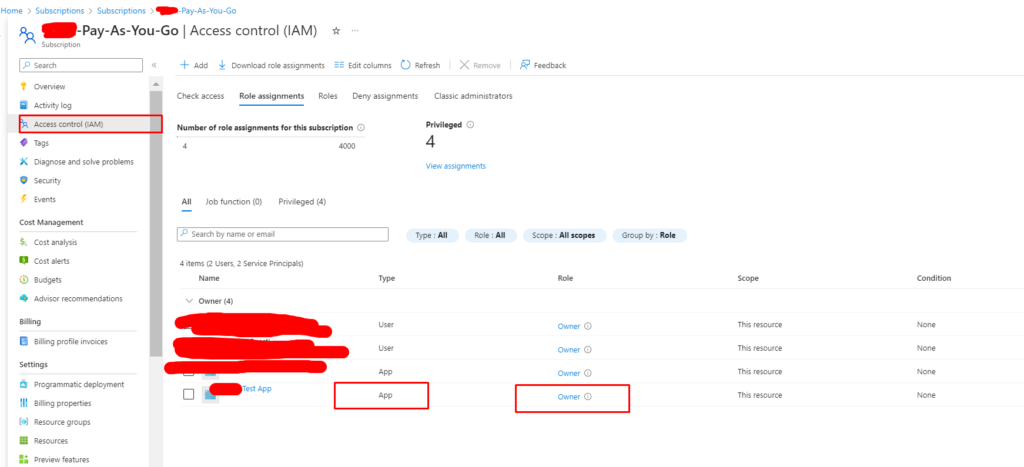
Now, Our an AD app is completely ready to access of selected subscription and resource group of this subscription.
Now you can use the Azure AD App in your PowerShell script. Update your script as follows:
StopWebApp.ps1
cls
$ResourceGroupName = "YourResourceGroupName"
$Name = "YourWebAppName"

"Stopping web application " + $Name
"ResourceGroupName: " + $ResourceGroupName
"Name: " + $Name

$SubscriptionId = "YourSubscriptionId"
"SubscriptionId is: " + $SubscriptionId

# from the Azure AD app registration
$clientSecret = "YourClientSecret"
$azureAplicationId = "YourApplicationClientId"
$azureTenantId= "YourTenantId"
$azurePassword = ConvertTo-SecureString $clientSecret -AsPlainText -Force
$psCred = New-Object System.Management.Automation.PSCredential($azureAplicationId , $azurePassword)


# login to Azure and set the current context
Connect-AzAccount -Credential $psCred -TenantId $azureTenantId -ServicePrincipal
Set-AzContext -Subscription $SubscriptionId
Start-AzWebApp -ResourceGroupName $ResourceGroupName -Name $Name
"Finished - Started"
StopWebApp.ps1
cls
$ResourceGroupName = "YourResourceGroupName"
$Name = "YourWebAppName"

"Stopping web application " + $Name
"ResourceGroupName: " + $ResourceGroupName
"Name: " + $Name

$SubscriptionId = "YourSubscriptionId"
"SubscriptionId is: " + $SubscriptionId

# from the Azure AD app registration
$clientSecret = "YourClientSecret"
$azureAplicationId = "YourApplicationClientId"
$azureTenantId= "YourTenantId"
$azurePassword = ConvertTo-SecureString $clientSecret -AsPlainText -Force
$psCred = New-Object System.Management.Automation.PSCredential($azureAplicationId , $azurePassword)


# login to Azure and set the current context
Connect-AzAccount -Credential $psCred -TenantId $azureTenantId -ServicePrincipal
Set-AzContext -Subscription $SubscriptionId
Stop-AzWebApp -ResourceGroupName $ResourceGroupName -Name $Name
"Finished - Stopped"
If you want to start/stop using single script, see below:
StartStopWebApp.ps1
cls
# Service Principal Credentials
$tenantId = "YourTenantId"
$appId = "YourApplicationClientId"
$appSecret = "YourClientSecret"

# Create a PSCredential object
$credential = New-Object System.Management.Automation.PSCredential($appId, (ConvertTo-SecureString -String $appSecret -AsPlainText -Force))

# Connect to Azure using service principal credentials
Connect-AzAccount -ServicePrincipal -Tenant $tenantId -Credential $credential

# Set the subscription context (replace 'YourSubscriptionName' with your subscription name or ID)
Set-AzContext -SubscriptionId 'YourSubscriptionId'

# Variables
$resourceGroupName = "YourResourceGroupName"
$webAppName = "YourWebAppName"

# Start the Azure Web App
function StartStop-AzureWebApp {
    param (
        [string]$resourceGroupName,
        [string]$webAppName
    )

    $webApp = Get-AzWebApp -ResourceGroupName $resourceGroupName -Name $webAppName

    if ($webApp.State -eq 'Stopped') {
        Start-AzWebApp -ResourceGroupName $resourceGroupName -Name $webAppName
        Write-Output "Azure Web App $webAppName started successfully."
    } elseif ($webApp.State -eq 'Running') {
        Stop-AzWebApp -ResourceGroupName $resourceGroupName -Name $webAppName
        Write-Output "Azure Web App $webAppName stopped successfully."
    }else{
	Write-Output "Azure Web App $webAppName Not started nor stopped. Please check web app."
   }
}

# Usage
StartStop-AzureWebApp -resourceGroupName $resourceGroupName -webAppName $webAppName
Replace “YourApplicationClientId”, “YourTenantId”, and “YourClientSecret” with the respective values obtained when you created the Azure AD App. Also, Replace “your-subscription-id”, “YourResourceGroupName”, and “YourWebAppName” with your actual subscription ID, resource group name, and web app name.
By using an Azure AD App, you ensure secure and controlled access to your Azure resources.
Method 3: Using Azure REST API to start and stop an Azure Web App
To use Azure REST API we will need some credentials, also we need to use the AD application for authorization and get credentials. Check the previous method (second way) on how to get credentials and set permission for it.
Here’s an example using PowerShell and Azure REST API.
StartWebApp.ps1
$ResourceGroupName = "YourResourceGroupName"
$WebAppName = "YourWebAppName"
$SubscriptionId = "YourSubscriptionId"

# Azure AD App credentials
$ClientId = "YourApplicationClientId"
$ClientSecret = "YourClientSecret"
$TenantId = "YourTenantId"

# Get the Azure AD token
$tokenEndpoint = "https://login.microsoftonline.com/$TenantId/oauth2/token"
$body = @{
    grant_type    = "client_credentials"
    client_id     = $ClientId
    client_secret = $ClientSecret
    resource      = "https://management.azure.com/"
}
$tokenResponse = Invoke-RestMethod -Uri $tokenEndpoint -Method Post -Body $body

# Start the Web App
$startEndpoint = "https://management.azure.com/subscriptions/$SubscriptionId/resourceGroups/$ResourceGroupName/providers/Microsoft.Web/sites/$WebAppName/start?api-version=2018-02-01"
Invoke-RestMethod -Uri $startEndpoint -Method Post -Headers @{ Authorization = "Bearer $($tokenResponse.access_token)" }

Write-Host "Web App '$WebAppName' has been started."
StopWebApp.ps1
$ResourceGroupName = "YourResourceGroupName"
$WebAppName = "YourWebAppName"
$SubscriptionId = "YourSubscriptionId"

# Azure AD App credentials
$ClientId = "YourApplicationClientId"
$ClientSecret = "YourClientSecret"
$TenantId = "YourTenantId"

# Get the Azure AD token
$tokenEndpoint = "https://login.microsoftonline.com/$TenantId/oauth2/token"
$body = @{
    grant_type    = "client_credentials"
    client_id     = $ClientId
    client_secret = $ClientSecret
    resource      = "https://management.azure.com/"
}
$tokenResponse = Invoke-RestMethod -Uri $tokenEndpoint -Method Post -Body $body

# Stop the Web App
$stopEndpoint = "https://management.azure.com/subscriptions/$SubscriptionId/resourceGroups/$ResourceGroupName/providers/Microsoft.Web/sites/$WebAppName/stop?api-version=2018-02-01"
Invoke-RestMethod -Uri $stopEndpoint -Method Post -Headers @{ Authorization = "Bearer $($tokenResponse.access_token)" }

Write-Host "Web App '$WebAppName' has been stopped."
Replace the placeholders “YourResourceGroupName“, “YourWebAppName“, “YourSubscriptionId“, “YourApplicationClientId“, “YourClientSecret“, and “YourTenantId” with your actual Azure resource information.
These scripts use Azure AD App credentials to authenticate against the Azure REST API, obtain an access token, and then use that token to start or stop the specified Web App. Ensure your Azure AD App has the necessary permissions to manage the Web App.
So, In Above tutorial we have learned a few way to access Azure web app, from outside of Azure portal using the PowerShell Script and by creating Azure AD app.
I am working as Jr. Full Stack Developer (.NET/Angular) at Samarpan Infotech. I've good analytical thinking and collaboration skills, and I love working with a team.