How to Configure Auto-Healing for Your Azure Web App: Tutorial Guide


Running a web application requires you to be ready for any problems that can occur, such as 500 errors or reports of downtime from your users. Without any setting needed, App Service diagnostics is an intelligent and engaging experience that can assist you in troubleshooting your app.
If your app does experience problems, App Service diagnostics identifies the problem and directs you to the appropriate resources so you can diagnose and fix it more quickly and easily.
The issues such as memory problems, slowness in requests, 500 errors, etc may be resolved temporarily with a simple restart or other mitigation steps. The issue is that these types of problems can occur during our non-business hours.
The auto heal feature is an excellent tool for configuring custom mitigation actions to be executed when certain conditions are met (You can configure what you need). These issues may be resolved temporarily with a simple restart or other mitigation steps. The issue is that these types of problems can occur during our non-business hours.
What is Auto-Heal in Azure?
Auto-healing is a mitigation action you can take when your app is having unexpected behavior. You can set your own rules based on request count, slow request, memory limit, and HTTP status code to trigger mitigation actions. Use the tool to temporarily mitigate an unexpected behavior until you find the root cause.
Where can I configure the Auto-Heal tool?
We must navigate to the app service itself on the Azure Portal. Then click on “Diagnose and solve problems” from the menu options.
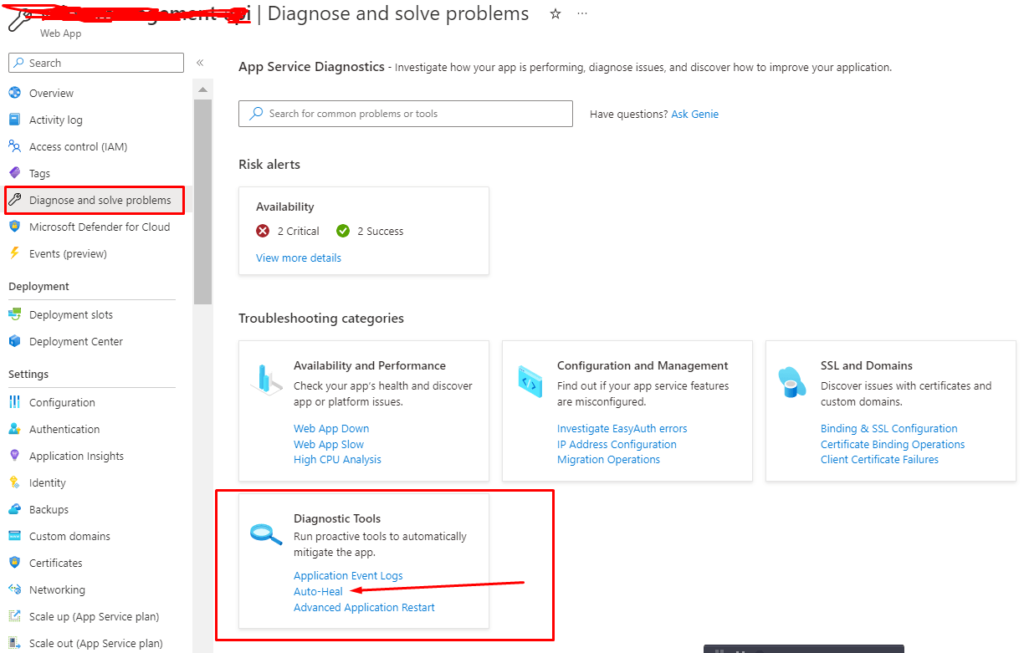
When you are click on the “Auto-Heal” under the “Diagnostic Tools” box, you will navigate to another window. When you’re there, you can head on over to the proactive tools. Here you will find the “Auto-Heal” capability.
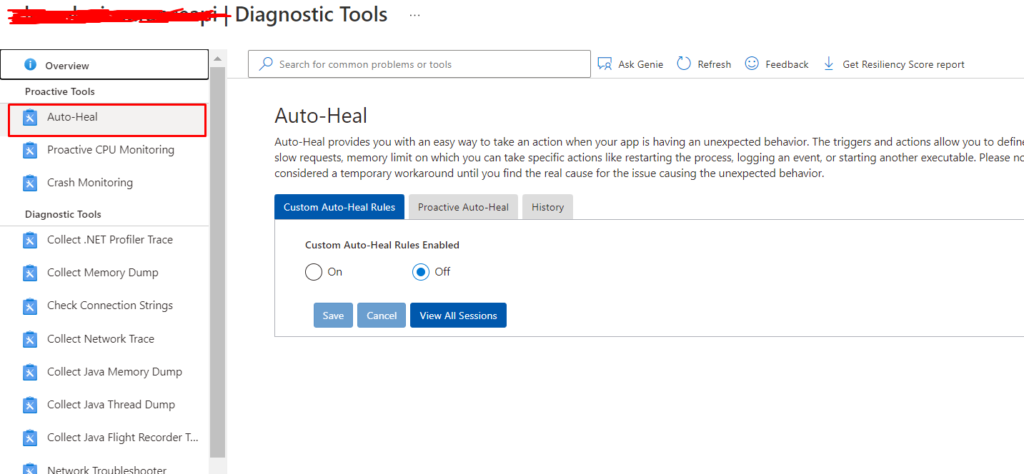
In this tool, you have a few options. Let’s very briefly check them out.
Custom Auto-Heal rules
How to configure the Auto-Heal feature?
If you want to customize how your application recycles and heals, you can do so based on a different types of conditions.
Depending on the application you use, your views will likely be different. I am configuring this web application to recycle whenever there are too many slow requests. If there are 100 slow requests (taking 20 seconds or more) in the last 300 seconds, I will automatically recycle the application service.
Let’s see:
1. Define Conditions:
The first thing we must do is select the condition we want to set on the mitigation rule.
The conditions supported on the Auto heal:
- Request Duration: examines slow requests.
- Memory Limit: examines process memory in private bytes.
- Request Count: examines number of requests.
- Status Codes: examines number of requests and their HTTP status code
I’m set condition If there are 100 slow requests are taking 20 seconds or more in the last 300 seconds, my app will be automatically recycle.(you can set as per your needs)
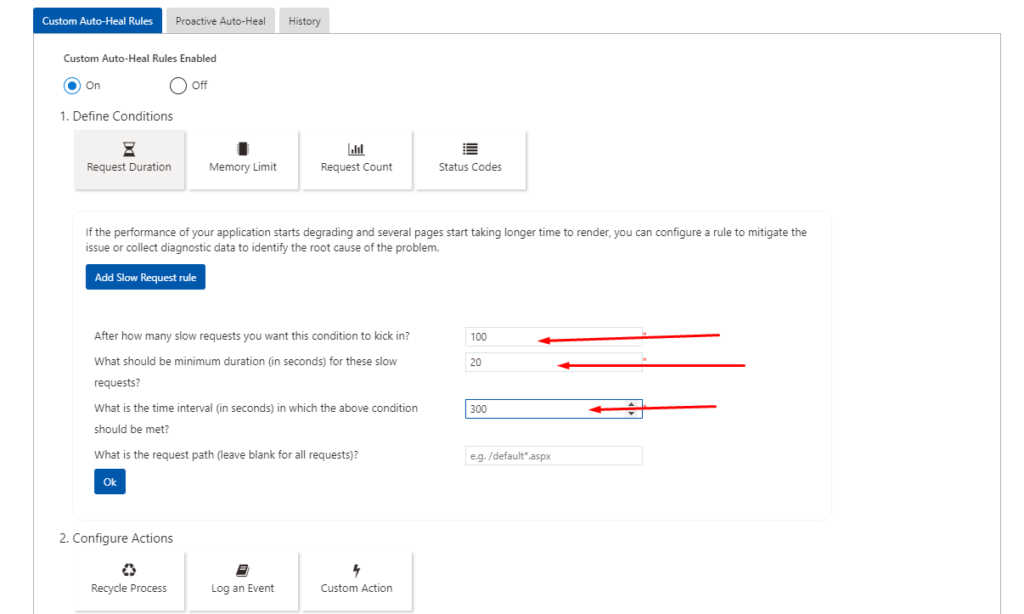
After reading the description, and adding the details, select the blue “OK” button to configure the rule parameters that you need.
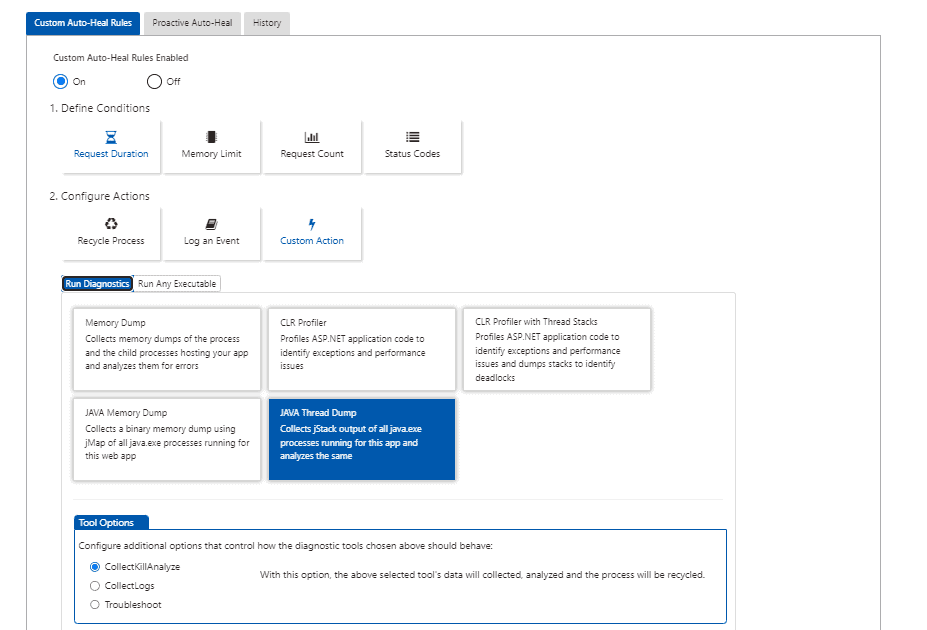
2. Configure Actions:
Select the option that best matches the auto heal mitigation action that you need to perform under the mitigation rule conditions that we configured on the above step.
The auto heal feature supported 3 possible actions to mitigate the problems:
- Recycle Process:
- Log an Event:
- Custom Action:
- Run Diagnostics
- Memory dump
- Java Memory Dump
- Java Thread Dump
- CLR Profiler
- CLR Profiler with Thread Stacks
- Run Any Executable
- Run Diagnostics
Collect, Kill, and Analyze
In this mode, data is collected and the process is terminated when the configured condition is met. Furthermore, the data is analyzed, and an analysis report is created.
I’m selecting “Recycle Process” action, it will automatically recycle our web app when certain condition is met.
What happens during a recycle?
I wanted to test the scenarios with the auto-healing capabilities and find out what happens to the existing requests being provided to users in order to make sure I didn’t wreck havoc in my production systems.
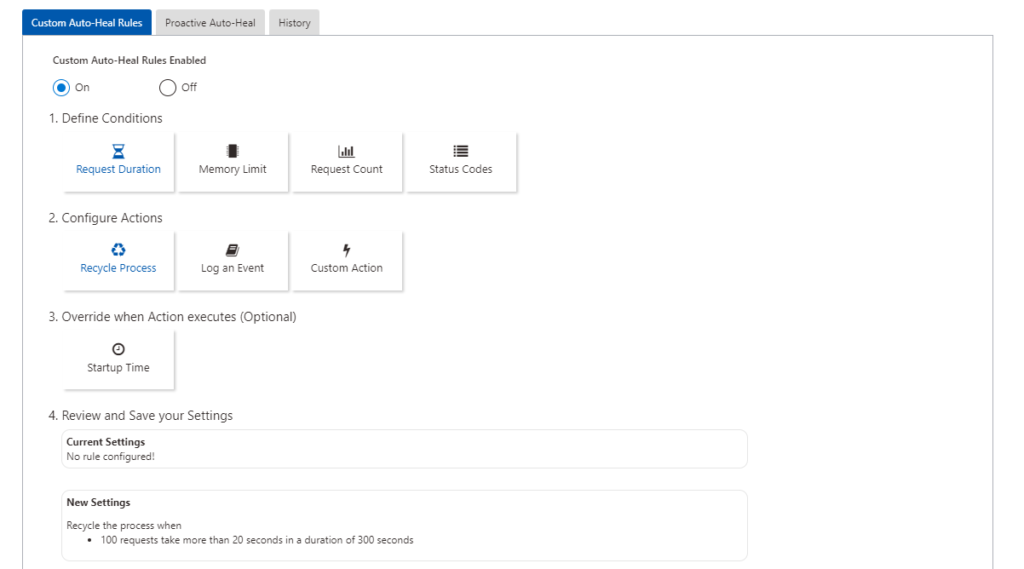
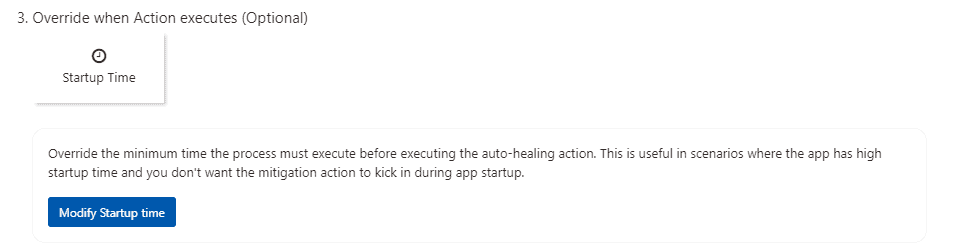
3. Override When Action Executes
When an app has a long startup time, depending on the mitigation rule conditions that are set, the mitigation action may be initiated during app startup, which is not the intended use case. By modifying the startup time, you can specify how long the mitigation rule should wait after the process starts before kicking in.
It is optional that’s why I’m not selecting it and nothing to set for modify startup time but you can select If you need it.
4. Review and Save your Settings
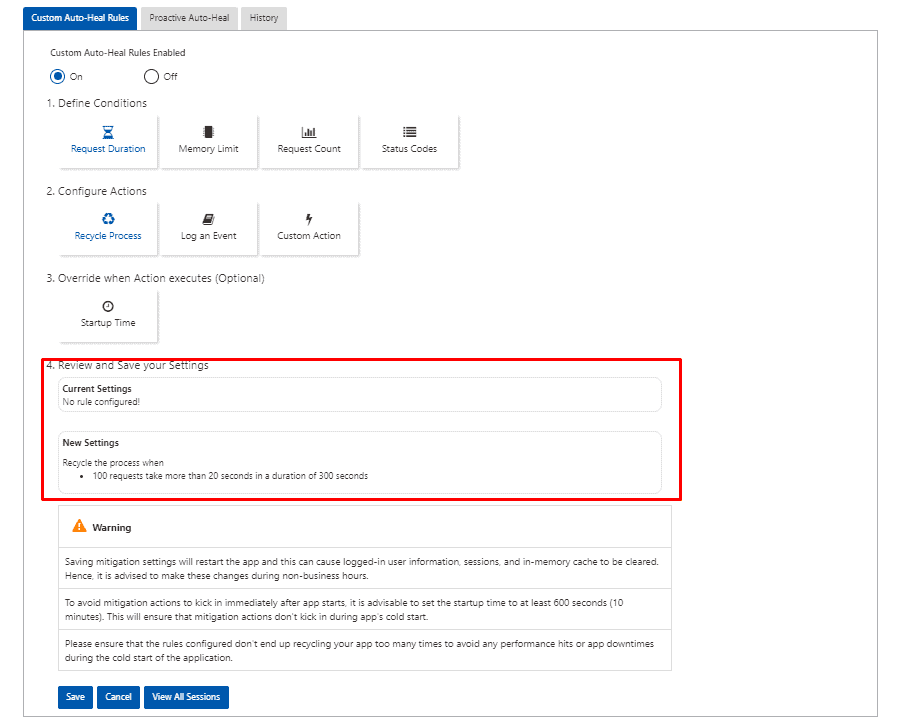
Because saving the settings causes the application to restart, we recommend making these changes outside of business hours.
We must keep in mind that these mitigation actions should only be considered a temporary workaround. The goal of this feature is to provide tools that can assist in determining the cause of unexpected behaviour.
Your configuration of the auto-heal may, of course, differ quite a lot from the basic example I gave above.
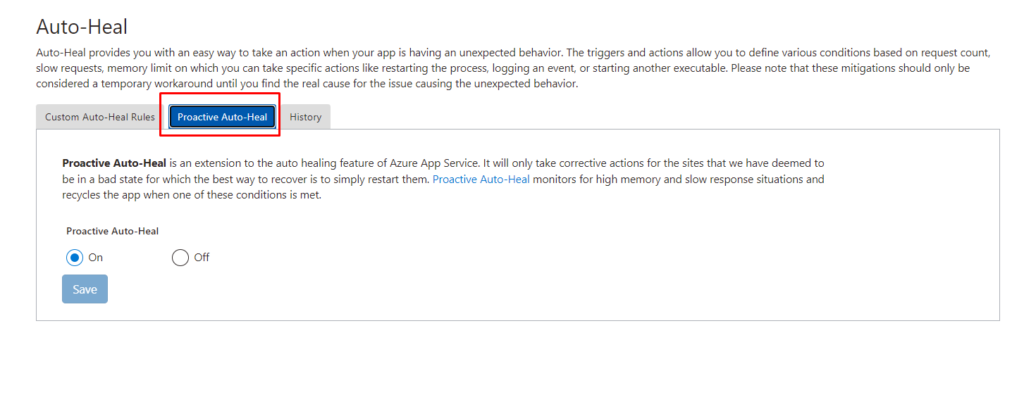
Proactive Auto-Heal
The next step is to set up a proactive auto-heal that is totally automated by the Azure service.
By default, proactive AutoHeal will be enabled for your App Service. It will watch out for high memory usage or slow requests and will restart your process for you.
Proactive Auto-Heal is an addition to Azure App Service’s auto healing feature. It will only take corrective actions for sites that we have determined are in a bad state and can be recovered by simply restarting them. When one of these conditions is met, Proactive Auto-Heal recycles the app. It monitors for high memory and slow response situations.
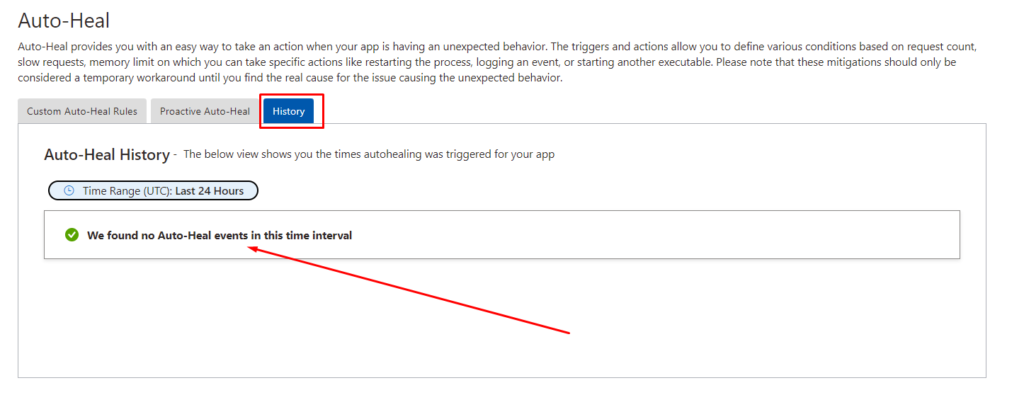
History of Auto-Heal Triggers
Fortunately, my apps have been behaving well recently, and I don’t have any historical events or recycles. However, if your app has been auto-healed and recycled, or if it has performed other actions according to your custom rules, you will see it here.
AutoHeal shouldn’t be used as a permanent replacement for working code!
Summary:
In the above article, we saw how to enable auto-healing in Azure web app.
Moreover, if you’re dealing with enterprise cloud software or large-scale cloud applications, you may wish to seek professional assistance. For an expert helping hand, Get in touch with our Azure consulting services experts having a minimum of 8+ years of experience working on Azure IoT, Cloud Integration & Migration, DevOps, Analytics and many more Azure services.
I am working as Jr. Full Stack Developer (.NET/Angular) at Samarpan Infotech. I've good analytical thinking and collaboration skills, and I love working with a team.