Angular: Create Dynamic Form with Controls & Validation


In this tutorial article, we’ll learn how we can create a dynamic form with different form controls and validation using Angular 11.
Prerequisites:
- Prior knowledge of TypeScript.
- Prior knowledge of JavaScript.
- Visual studio code.
- A development machine with Node 12.11.1+ & NPM 6.14.11+ installed.
Step-by-step tutorial of create dynamic form with different form controls & validation using angular
Step 1: Installing Angular CLI
First step, where we’ll have to install latest version of Angular CLI 11.
$ npm install -g @angular/cliStep 2: Creating your Angular 11 Project
- In this second step, we will use Angular CLI to start our Angular Project
- Go to CMD or Terminal and use this command:
$ ng new demo-form- This CLI will ask you “whether you would like to add Angular routing” Say Yes.
- It will ask “which stylesheet format you would like to use”. Choose CSS.
- Now your project is ready Angular CLI will generate required files and folders along with NPM packages and routing too.
- After that open your project in Visual studio code and go to your root folder and run the local development server using below command:
$ npm start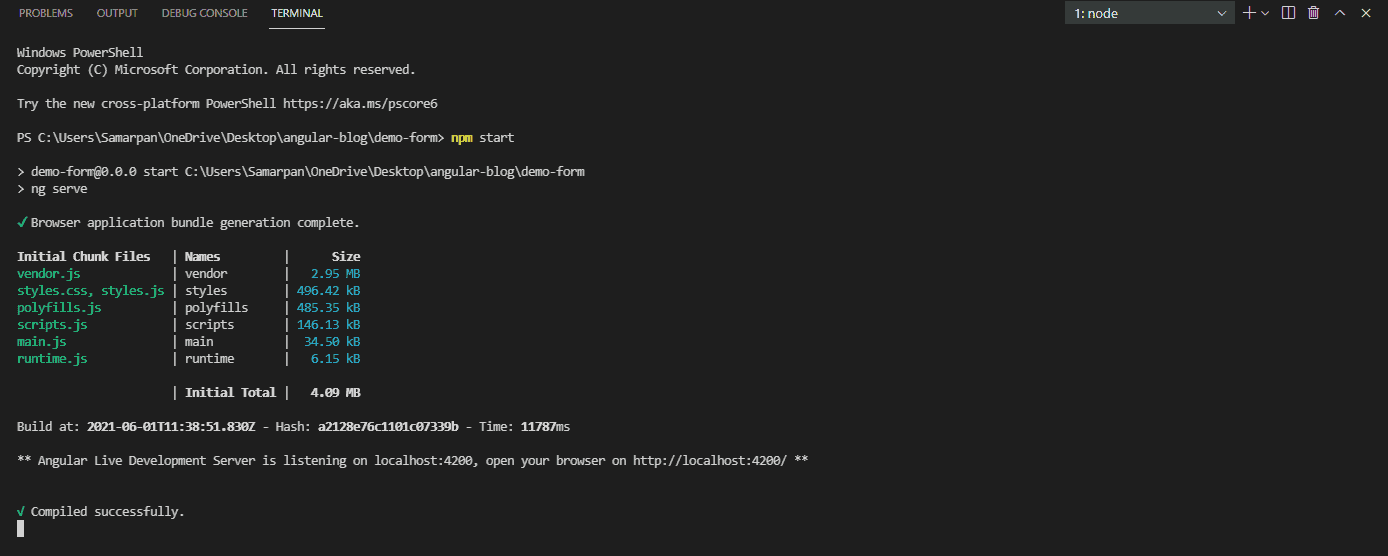
Now run localhost:4200/ in your browser.
Step 3: Add Bootstrap in our project
Here, we are adding bootstrap CDN Link inside index.html page.
<!doctype html>
<html lang="en">
<head>
  <meta charset="utf-8">
  <title>DemoForm</title>
  <base href="/">
  <meta name="viewport" content="width=device-width, initial-scale=1">
  <link rel="stylesheet" href="https://maxcdn.bootstrapcdn.com/bootstrap/4.5.2/css/bootstrap.min.css">


  <!-- jQuery library -->
  <script src="https://ajax.googleapis.com/ajax/libs/jquery/3.5.1/jquery.min.js"></script>

<!-- Popper JS -->
  <script src="https://cdnjs.cloudflare.com/ajax/libs/popper.js/1.16.0/umd/popper.min.js"></script>

<!-- Latest compiled JavaScript -->
  <script src="https://maxcdn.bootstrapcdn.com/bootstrap/4.5.2/js/bootstrap.min.js"></script>
  <link rel="icon" type="image/x-icon" href="favicon.ico">

</head>
<body>
  <app-root></app-root>
</body>
</html>
Step 4: Create interface for FormFields and Dropdown value
Here in app.interface.ts file we’re taking properties of control in IFormField and IDropdown

export interface IFormField {
  label: string;
  fieldName: string;
  fieldType: string;
  fieldValue: string;
  placeholder: string;
  values: IDropdown[]; // To fill dropdown
}

export interface IDropdown {
  displayValue: string;
  internalValue: string;
}

export interface IUser {
  userName: string;
}
Step 5: Declare Formgroup and form fields
Here in app.component.ts file , Declaration of Form group and IFormFields (array of multiple controls)

export class AppComponent {
  title = 'demo-form';

  // Form declaration
  formDemo: FormGroup;
  lstForm: IFormField[] = [];
Step 6: Set Form Controls
- Here in app.component.ts file, we are set controls statically. We can also set it from DB.
- Please Note: Here, we describe the different validation type with different controls.


constructor(
private formBuilder: FormBuilder,
private appService: AppService
) {}
ngOnInit(): void {
this.formDemo = this.formBuilder.group({});
this.setForm();
}
setForm() {
// text box
// required filed validation
// remote validation for check is username exits or not
let _un = <IFormField>{
label: 'User Name',
fieldName: 'userName',
fieldType: 'text',
fieldValue: 'DemoUser',
};
this.lstForm.push(_un);
// Text Box
// With Require Field Validation
let _fn = <IFormField>{
label: 'First Name',
fieldName: 'firstName',
fieldType: 'text',
fieldValue: 'Demo FirstName',
};
this.lstForm.push(_fn);
// Text Box
// With Require Field Validation
let _ln = <IFormField>{
label: 'Last Name',
fieldName: 'lastName',
fieldType: 'text',
fieldValue: 'Demo lastName',
};
this.lstForm.push(_ln);
// Text Box - Email
// With Regex and Requitepatter Validation
let _email = <IFormField>{
label: 'Email',
fieldName: 'email',
fieldType: 'email',
fieldValue: 'test@test.com',
};
this.lstForm.push(_email);
// Text Box - contact Number
// required field validation
let _cn = <IFormField>{
label: 'Phone',
fieldName: 'phone',
fieldType: 'text',
fieldValue: '123-456-7890',
};
this.lstForm.push(_cn);
// Text Box - date
// custome validation - check date greater than or equal to today date
let _dob = <IFormField>{
label: 'Date Of Birth',
fieldName: 'dob',
fieldType: 'date',
fieldValue: '',
};
this.lstForm.push(_dob);
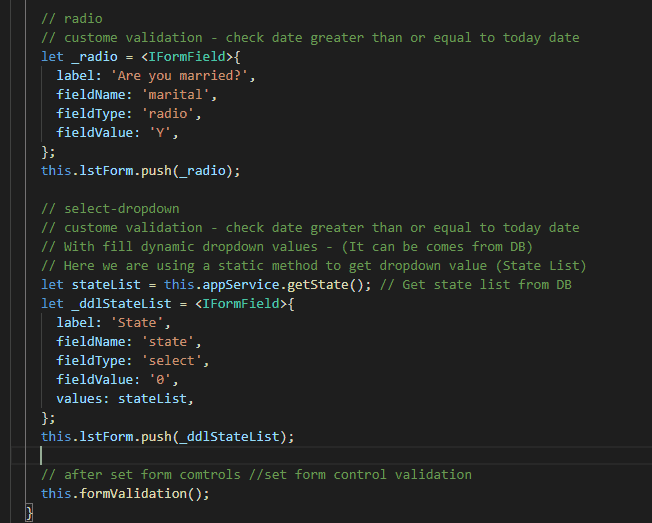
// radio
// custome validation - check date greater than or equal to today date
let _radio = <IFormField>{
label: 'Are you married?',
fieldName: 'marital',
fieldType: 'radio',
fieldValue: 'Y',
};
this.lstForm.push(_radio);
// select-dropdown
// custome validation - check date greater than or equal to today date
// With fill dynamic dropdown values - (It can be comes from DB)
// Here we are using a static method to get dropdown value (State List)
let stateList = this.appService.getState(); // Get state list from DB
let _ddlStateList = <IFormField>{
label: 'State',
fieldName: 'state',
fieldType: 'select',
fieldValue: '0',
values: stateList,
};
this.lstForm.push(_ddlStateList);
// after set form comtrols //set form control validation
this.formValidation();
}Step 7: Set Value of Dropdown field:
For that, here create one service file (app.service.ts) file in our root directory. And write code like blow.
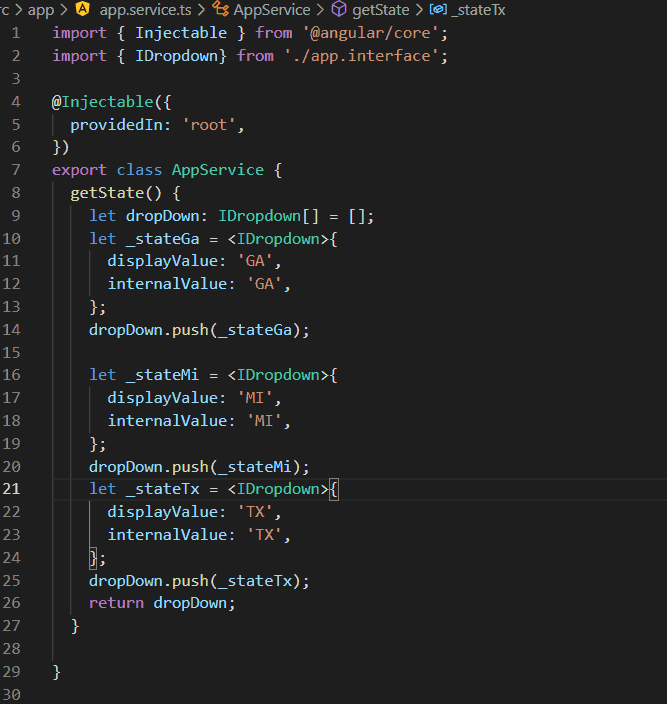
import { Injectable } from '@angular/core';
import { IDropdown} from './app.interface';

@Injectable({
  providedIn: 'root',
})
export class AppService {
  getState() {
    let dropDown: IDropdown[] = [];
    let _stateGa = <IDropdown>{
      displayValue: 'GA',
      internalValue: 'GA',
    };
    dropDown.push(_stateGa);

    let _stateMi = <IDropdown>{
      displayValue: 'MI',
      internalValue: 'MI',
    };
    dropDown.push(_stateMi);
    let _stateTx = <IDropdown>{
      displayValue: 'TX',
      internalValue: 'TX',
    };
    dropDown.push(_stateTx);
    return dropDown;
  }

}
Step 8: Set form validation
Here in app.component.ts file, we are using different type of validations dynamically, Like
- Required field validation
- Custom validation,
- Remote validation,
- Custom Date Validation, etc.
Below function is used for create dynamically validation in our form.
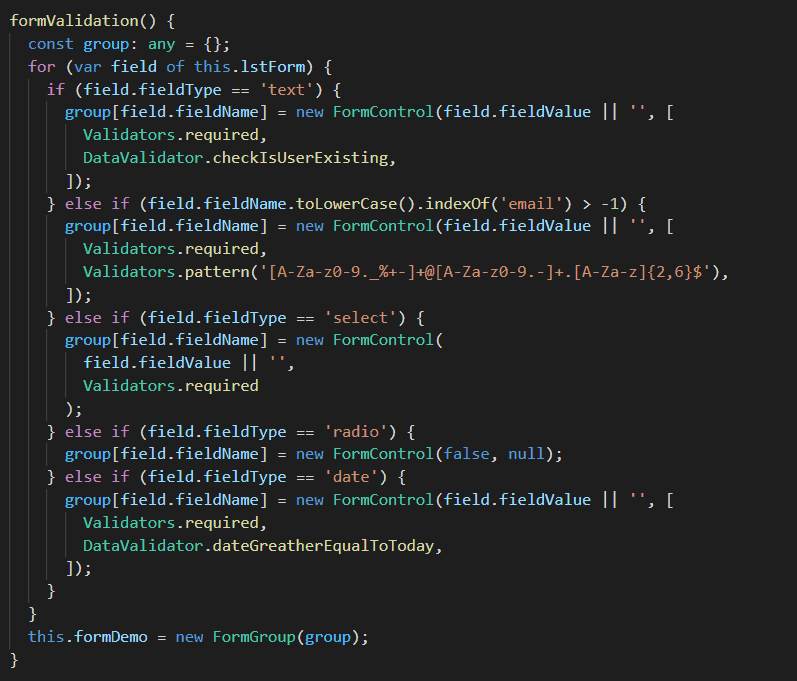
formValidation() {
    const group: any = {};
    for (var field of this.lstForm) {
      if (field.fieldType == 'text') {
        group[field.fieldName] = new FormControl(field.fieldValue || '', [
          Validators.required,
          DataValidator.checkIsUserExisting,
        ]);
      } else if (field.fieldName.toLowerCase().indexOf('email') > -1) {
        group[field.fieldName] = new FormControl(field.fieldValue || '', [
          Validators.required,
          Validators.pattern('[A-Za-z0-9._%+-]+@[A-Za-z0-9.-]+.[A-Za-z]{2,6}$'),
        ]);
      } else if (field.fieldType == 'select') {
        group[field.fieldName] = new FormControl(
          field.fieldValue || '',
          Validators.required
        );
      } else if (field.fieldType == 'radio') {
        group[field.fieldName] = new FormControl(false, null);
      } else if (field.fieldType == 'date') {
        group[field.fieldName] = new FormControl(field.fieldValue || '', [
          Validators.required,
          DataValidator.dateGreatherEqualToToday,
        ]);
      }
    }
    this.formDemo = new FormGroup(group);
  }
Step 9: Create custom validation file
Here, we have to create custom validation file for custom date validation and check username exits or not.
- Create validation (data.validation.ts) file inside our root directory. And write code like below:

import { FormControl } from '@angular/forms';
export class DataValidator {
  static dateGreatherEqualToToday(control: FormControl): { [key: string]: any; } {
    let isValidFormat = false;
    let dateString = control.value;

    if(dateString != ""){
      var regEx = /^\d{4}-\d{2}-\d{2}$/;
      isValidFormat = dateString.match(regEx) != null;

      if (!isValidFormat)
        return { dateGreatherEqualToToday: true };
      else {
        let todayDate = new Date();
        const year = Number(control.value.substr(0, 4));
        const month = Number(control.value.substr(5, 2));
        const date = Number(control.value.substr(8, 2));
        let controlDate = new Date(year, month - 1, date, 23, 59, 59);

        if (todayDate < controlDate) return { dateGreatherEqualToToday: true };
        else {
          return { dateGreatherEqualToToday: false };
        }
      }
  }
    return { dateGreatherEqualToToday: false };
  }

  static checkIsUserExisting(control: FormControl): {[key: string]: any;}{
    let val=control.value;
    var users = ["UserDemo", "UserTest", "JohnUser", "TestUser"];
    var a = users.indexOf(val);
    if (a > -1) {
      return {checkIsUserExisting:true};
    } else {
      return {checkIsUserExisting:false};
    }
  }
}
After creating this file, import this file inside app.component.ts file.
Step 10: Set HTML Page
Add below code in app.component.html file
<div class="container">
  <div class="panel panel-default" style="width: 50%;">
    <div class="panel-heading">  <h2>Dynamic Form Demo</h2>    </div>
    <div class="panel-body">
      <form [formGroup]="formDemo" (ngSubmit)="onSubmit()">
        <div class="row">
          <div class="col-md-12" *ngFor="let formData of lstForm" [ngSwitch]="true">
            <div class="form-group">
              <label for="{{formData.fieldName}}">{{formData.label}}</label>

              <input type="{{formData.fieldType}}" name="{{formData.fieldName}}" class="form-control" *ngSwitchDefault
               [formControlName]="formData.fieldName" [(ngModel)]="formData.fieldValue"
               placeholder="{{formData.placeholder}}">


              <select [id]="formData.fieldName" [formControlName]="formData.fieldName"
                *ngSwitchCase="formData.fieldType === 'select'"
                class="form-control" [(ngModel)]="formData.fieldValue">
                <option [value]='0'>Select State</option>
                <option *ngFor="let opt of formData.values" [value]="opt.internalValue">
                  {{opt.displayValue}}</option>
              </select>

              <div class="custom-control custom-switch" *ngSwitchCase="formData.fieldType === 'radio'">
                <input id="customSwitch1" type="checkbox" [checked]="formData.fieldValue == 'Y'? true:false" class="custom-control-input" >
                <label class="custom-control-label" for="customSwitch1">Yes</label>
              </div>

              <div class="error-txt-msg" *ngIf="formDemo.controls[formData.fieldName].hasError('dateGreatherEqualToToday')" style="color: red;">
                Date is not correct format or greater than equal to today date.
              </div>
              <div class="error-txt-msg" *ngIf="formDemo.controls[formData.fieldName].hasError('checkIsUserExisting')" style="color: red;">
                UserName aleready exist.
              </div>
              <div *ngSwitchCase="formData.fieldType === 'select'">
                <div  class="error-txt-msg mb-2" *ngIf="formDemo.controls[formData.fieldName].value == '0'" style="color: red;">
                  Required field.
                </div>
              </div>
              <div class="error-txt-msg mb-2" *ngIf="formDemo.controls[formData.fieldName].hasError('required')" style="color: red;">
                Required field.
              </div>
              <div class="error-txt-msg mb-2" *ngIf="formDemo.controls[formData.fieldName].hasError('pattern')" style="color: red;">
                Incorrect format.
              </div>
            </div>
          </div>
          <div class="form-group">
            <button type="submit" class="btn btn-primary">Submit</button>
          </div>

        </div>
      </form>
    </div>
  </div>
</div>
Output:
- With validation

- With value

- User name exits or not validation (remote validation)

- Email Field with pattern validation

- Date field with Custom validation

Over To You!
Looking for a Sample Source Code? Here you go: GITHUB.
That’s it for now. Today you have learn how to create dynamic form with controls and validations using Angular 11. If you have queries about tutorial, please ask our angular developers via GitHub Profile.
Related Read:
I am working as Jr. Full Stack Developer (.NET/Angular) at Samarpan Infotech. I've good analytical thinking and collaboration skills, and I love working with a team.